Wednesday, November 6, 2013

AndroVM – Máy ảo cho người lập trình android

Thông thường lập trình android sử dụng máy giả lập android đi kèm Android SDK. Tuy nhiên máy giả lập này khởi động lâu và độ phản hồi chậm. Để khắc phục hạn chế trên, sử dụng AndroVM.

AndroVM thực chất là máy ảo chạy trên nền VirtualBox. Thực hiện theo các bước sau:

1) Download and install VirtualBox. This is required in order to install Android (or any other operating system) without damaging your system or messing with BIOS, which can be time-consuming, and/or dangerous to the system..

2) Download AndroVM (click one of the links in this step to download their respective .ova file). For beginners, please choose the version complete with Adobe Flash Player and the Google Play store. If you are an advanced user (or don’t want Google Play as the Android Appstore), you may download the version without the Google Play store.

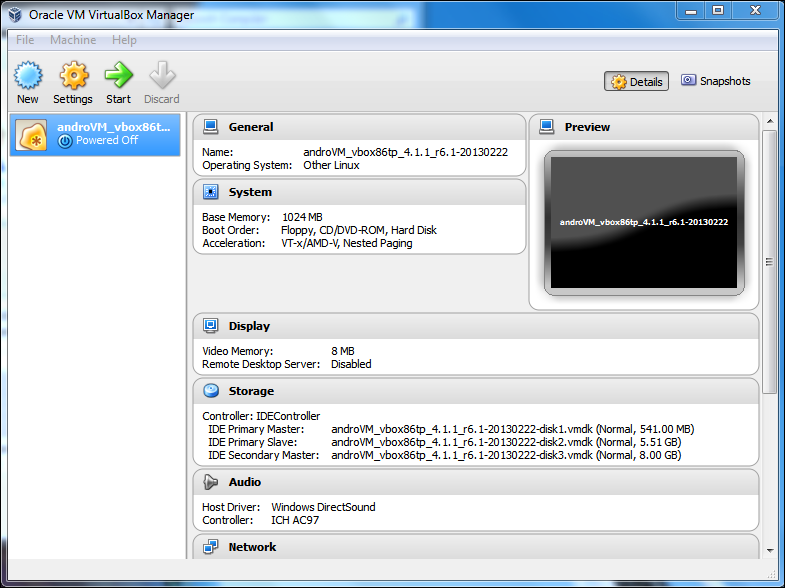
3) Navigate to the folder where you downloaded either .ova file, and double-click (open) it. You must have VirtualBox installed before opening the file, or it will not open properly. If you have VirtualBox installed, you should see something similar to the picture below:

As pointed out in the picture, you should make sure that the RAM (Random Access Memory) listed is 1/2 or less of the RAM available on your computer. For example, if you have 4 GB of RAM (4096 MB of RAM), the RAM listed in the dialog box should be 2048 MB (2GB) or less. If more than half of the available RAM on your computer is listed in the dialog box, then when you start the Android VM, your host computer (the computer you’re running VirtualBox on) will excessively swap out memory on your hard disk, which will lock up the host computer, and make it unstable.

4) Once you’re sure you have the right settings, click Import.
You may see a “Importing appliance” window, just wait until it finishes.
You should now see a screen like this:

5) You should now recall which version of AndroVM you have downloaded. If you have downloaded the AndroVM version with Flash and Google Play built into it, please skip to step 6, as you do not need to follow step 5. However,if you have downloaded the version without Google Play, please complete this step. As you may (or may not) know, if you want to download Android apps, but you don’t have Google Play, you have to get them from some other source. You can either a) search the Web for an .apk package that contains your app, which may or may not work; b) download another app store that replaces Google Play, and evade the direct .apk web search. Either way, you need to make a modification to Android in order to do this without Google Play, but we will save this for step 6.
Anyway, if you prefer to use the direct .apk search method (not recommended), skip this step, and go to step 6. However, it is recommended that you download an app store, so you may want to continue with this step.


6) Depending on which version of AndroVM you downloaded, you may need to configure your Android device differently. Either way, you should begin the virtual machine by clicking the Start button, as shown below in the yellow box:

You should now see the image below (it will be in color):

At this point, it may be helpful to put the VM in full screen (click View -> Switch to Fullscreen, click “Switch” if you see a dialog box).  If you ever want (or need) to pause the VM, click the Machine menu, and then “Pause”. The VM screen will be in grayscale (black and white) if it is paused. To unpause the VM, repeat the steps.
Anyway, the VM screen should show the above image for a few seconds, and then flash into what looks like a command prompt (Linux terminal in this case). You will see a few dialog boxes. Just read them through thoroughly, click “Do not show me this message again” or something similar if you choose to not have them show again, and then click OK. Next, you should see the typical Android logo flashing a few times (see below screenshot).

Please go to step 6a or 6b, depending on which version of AndroVM you have downloaded.

6a) If you downloaded the AndroVM version without Google Play and Flash Player, you will see the following screen (or something similar):

You should know what to do at this point: click and hold the padlock, and move your mouse to the unlocked padlock so that there is a white circle around it, and then let go of the mouse button. Now, you will see the Android home screen:

Do you remember the appstore .apk file we mentioned before? Good, because you need to install it! You need to configure a setting before installation can begin. However, this setting only needs to be configured once. Therefore, if you’ve completed this step already, you need not repeat it.

First, click the circle with 6 dots in in on the right panel. You’ll see a list of apps. Click “Settings”. You should be in the settings panel now. It looks like this:

Scroll down to the “Personal” section, and click the “Security” listing as shown in the picture above.
Next, find “Unknown sources”, and click on it so
it’s checked, as seen below:

You will get a prompt as shown below, read it and click OK.

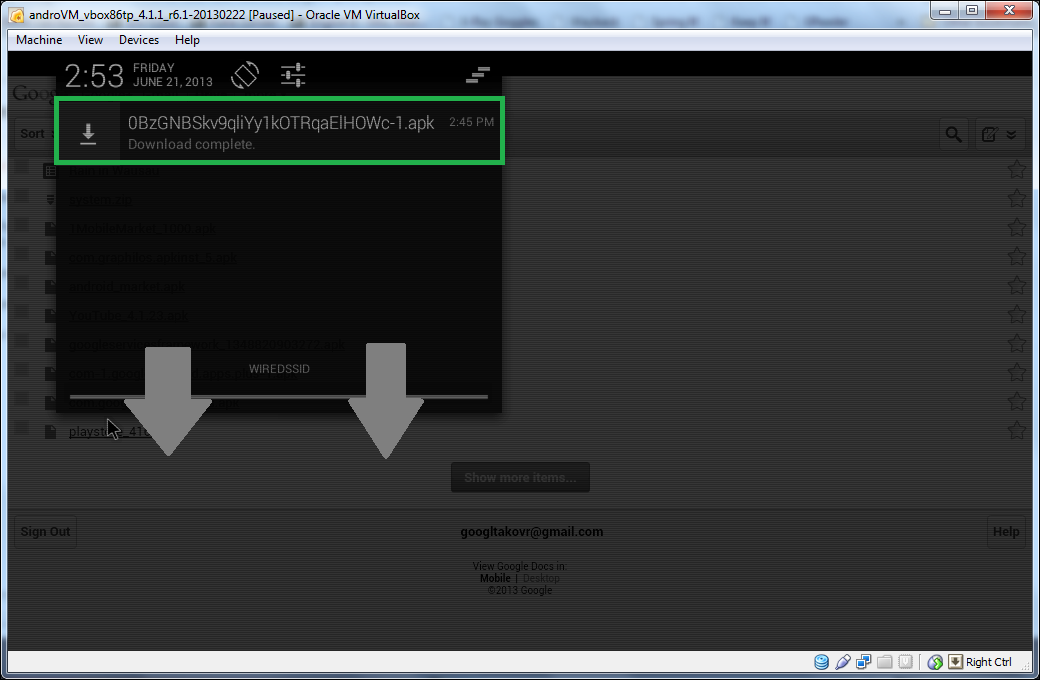
Next, tap the Home key on your keyboard. This will take you to the Android home screen, which you will need. Click the circle with 6 dots, to get to the app list. Click the Browser app. Now, navigate to Google Drive, SkyDrive, or wherever you stored that file. Open the file in your cloud service from the mobile Android browser and not the host computer’s browser. As soon as you open it, you should see a gray bar at the bottom that reads “Starting download…”. You should see a little download icon in the far left of the top notification bar of Android. The icon is circled in red below.

Next, pull down the notifications bar (click and drag the bar downwards, like in the below pic). When it’s opened, click on the .apk file, as shown in the picture:

If you already have the app installed, you will get a prompt asking if you want to replace the existing app with the one you are attempting to install. Choose OK if this is what you want to do, otherwise choose Cancel if you don’t want to replace the app, and cancel the installation. Unless you clicked Cancel to the prompt described above, you should now see the following screen (or something similar):

Click Install at the prompt to finish the installation. You should now see:

What you do here is at your discretion: you may open the app to see that it installed correctly (choose Open), or you may return to the Android home screen (choose Done, then hit the Home key on your keyboard. Please continue to step 7.

6b) If you downloaded the AndroVM version with Google Play and Flash Player, the Android startup sequence described in step 6 will commence, after which a setup wizard (no, not this wizard! :D) appears, as shown below:

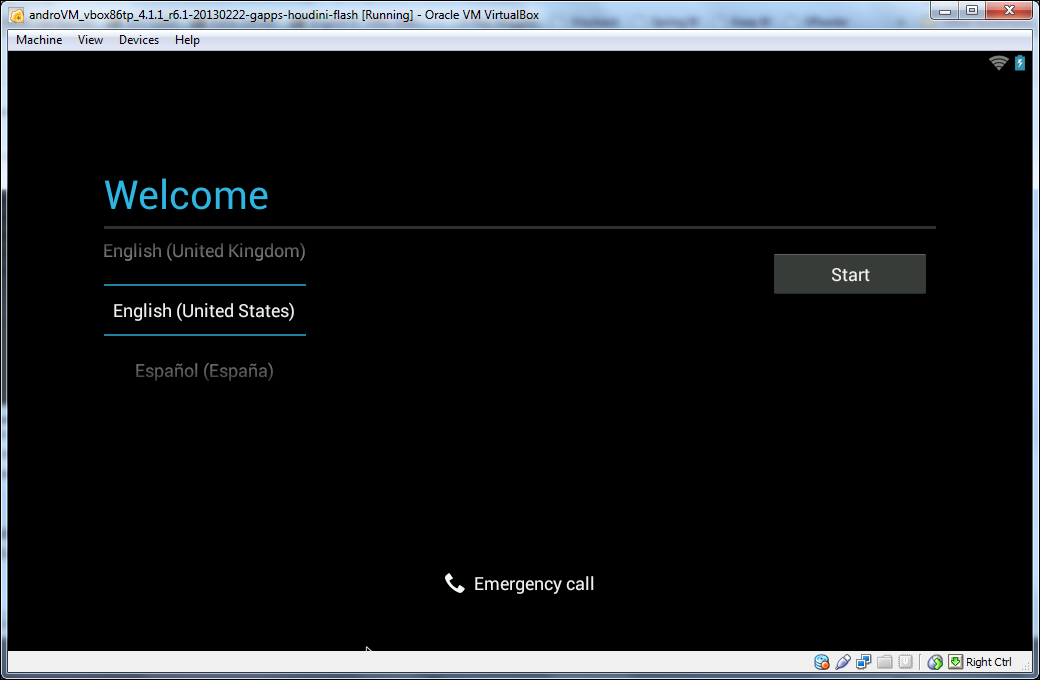
Choose your language from the list below the “Welcome” text, and then “Start” when you’ve chosen your language.
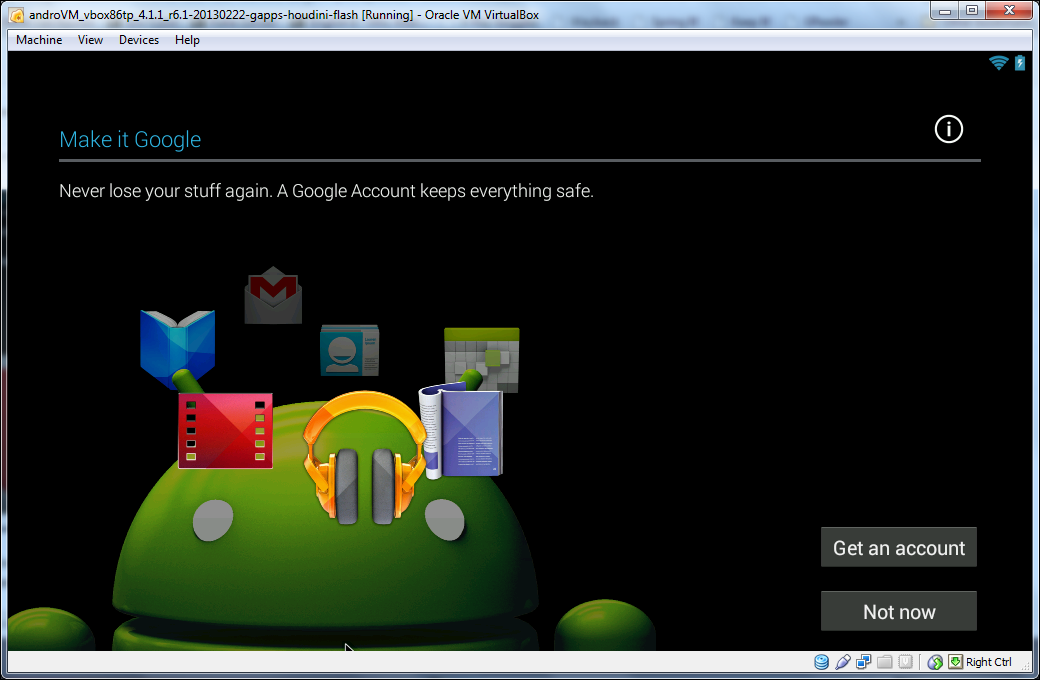
You will now be asked if you have a Google Account (as shown below).

If you use Gmail/Google+/YouTube/Blogger or any of the other Google goodies, select yes.
If you choose no, here’s what you see:

If you choose to sign up for a Google Account (click “Get an account”), you’ll be asked for your name, a Gmail username that you would like, about the same stuff they ask you for when you sign up for one on the Web. Here’s what the setup wizard’s Google Account sign-in screen looks like:

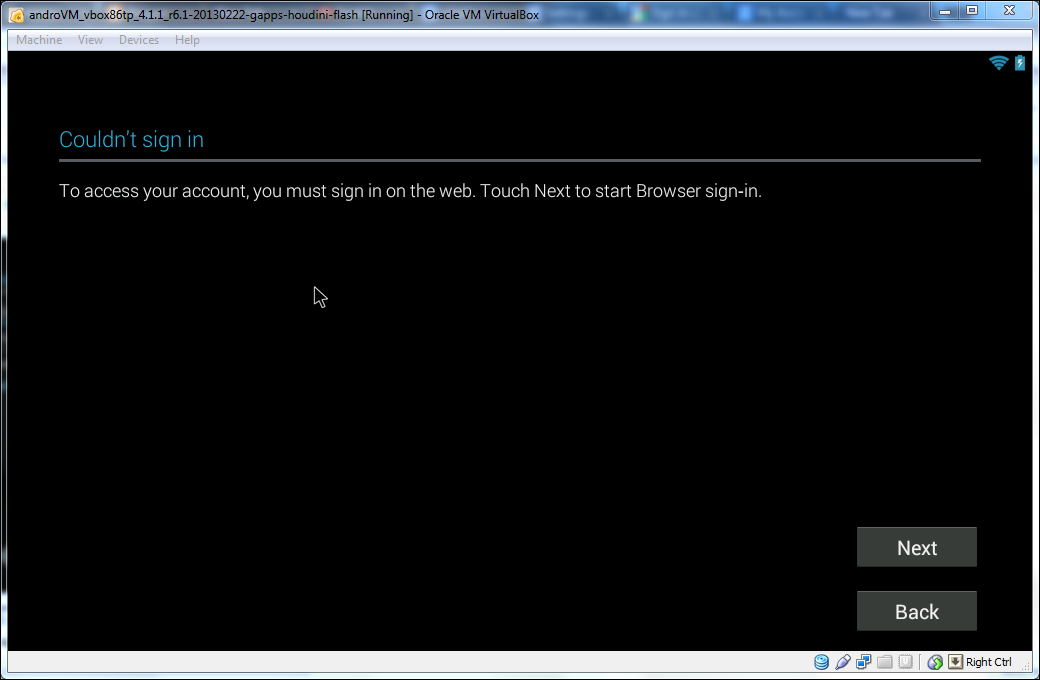
NOTE: If you have two-step authentication enabled for your Google Account, you will be asked to use browser sign-in, as shown below:

When you’ve successfully signed in, you will see the following screen:

It’s recommended that you not enter credit card info into your Android install, because if the install is not secure enough, a hacker (or maybe an inside job?) could use your data to make app purchases in your name without your knowledge.
Click “Not now” as circled in the above picture, then you should see something like the below screen:

It’s recommended that you leave at least the second checkbox in this page of the wizard checked, because if something happens to your AndroVM virtual machine, you have the machine’s settings backed up to your Google Account, which you can restore from the Google Account at a later time, should you need to do so. The first checkbox, however, will import the settings from your Google Account into the Android emulator, if any settings in said Google Account exist. When you’re satisfied with the backup settings, click the gray forward arrow in the bottom right corner of the window.
If the first checkbox is checked, Google will contact its servers to import settings to the virtual machine.

Next, you will see the following screen:

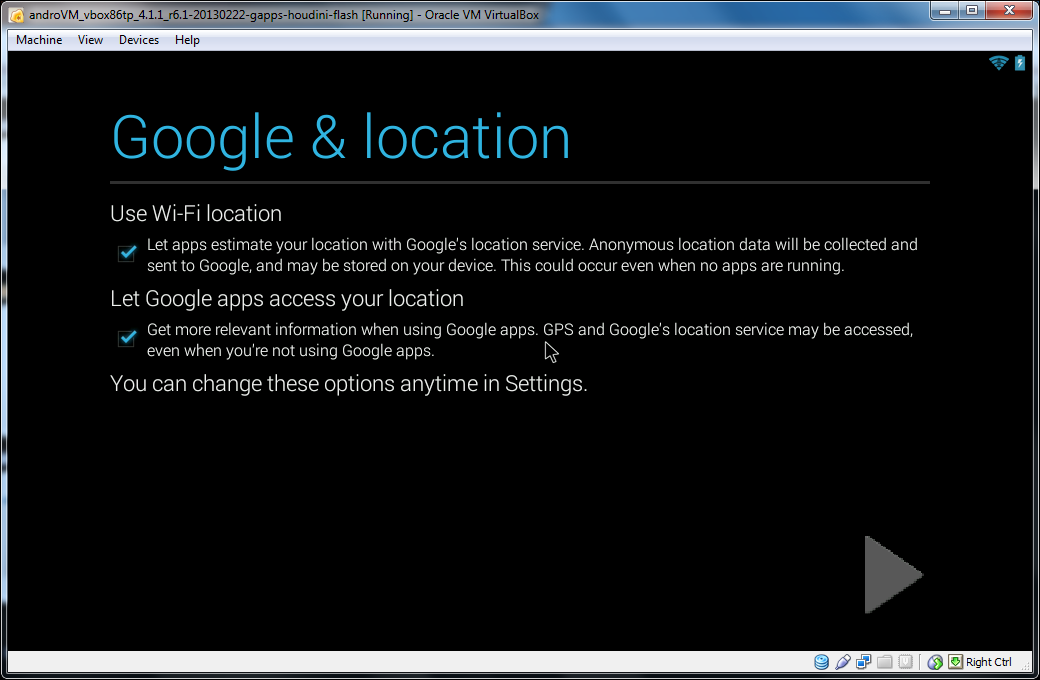
The settings explain themselves, and as before, click the arrow when you’re finished with the page.
Next, you will be prompted to set your current time, as shown below.

Click the forward button when you want to proceed. When you do, you will be shown this screen:

Enter your name, then click the forward arrow.
Finally, you will see this:

Click Finish, and you will see the Android Home Screen, with a little tutorial on how to use it. :)
Proceed to step 7.

7) Congratulations, you now have a working AndroVM emulator successfully configured in VirtualBox. But before we cut you loose to explore on your own, here are a few things to keep in mind that will help you use AndroVM better. You should read the keyboard shortcuts for Android, as they contain a wealth of information that you may need.NOTE: If you want to restart AndroVM (either version), you have to use the Ctrl+Alt+Delete shortcut combo. However, you can not press the key combo into the VM without invoking the function of the combination in the host PC. To send Ctrl+Alt+Delete without invoking the function in the host computer, open the Machine menu in the VM window, and click “Insert Ctrl-Alt-Delete”. Note that this will perform an immediate reboot of AndroVM (and not the host PC), and any unsaved work in the virtual machine will be lost.
Also, and this is very important, the AndroVM version with Google Play and Flash Player has backup capabilities, but the version lacking Google Play does not have the backup feature. This means that if something goes wrong (AndroVM won’t boot, etc.), if you are running the version of AndroVM without Google Play and Adobe Flash Player,you may not be able to backup the settings and apps in AndroVM. However, if you’re running the version with Google Play and Flash, and you have backup enabled, then everything you do will be saved to your Google Account, and restoration of apps and settings will be possible.
And another awesome feature if you have the Google Play version of AndroVM: when you go to the Google Play website, you can queue apps for installation to AndroVM (or any other Android device with Google Play) right on the Play website.
Finally, let’s cover the reset option in Android (which may or may not work, but it can be launched in either version of AndroVM). If you ever break AndroVM (or any Android device, for that matter), there is a way to reset it, which may or may not work. First, open the Android Home Screen (tap the Home key on your keyboard) if you aren’t there already. Next, click the circle with 6 dots. Open Settings, then scroll down until you find the “Backup and Reset” listing, and click on it. Next, look for “Factory data reset”, and click on it. Click the “Reset tablet” button, and finally “Erase everything” if you’re sure you want to reset the VM. Next, restart the VM (see note about Ctrl-Alt-Delete above). If the reset doesn’t work, you will need to delete the virtual machine, and create a new one. Be careful though – this will totally delete every app and setting you have put into the VM, so remember to backup!!
If you’re sure you want to delete the virtual machine and everything in it, follow the steps below.
a) First, close the VM window (if AndroVM is open), or start VirtualBox (if AndroVM is closed, and VirtualBox is not open).
b) In the left list of the VirtualBox window, right-click the name of the virtual machine, and choose “Remove” from the pop-up menu.
c) You will see the following dialog box:

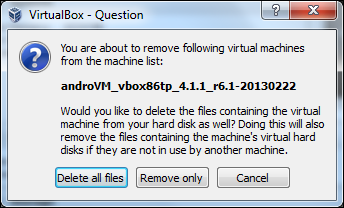
Choose “Delete all files”, and not “Remove only”, because if you choose “Remove only”, it will only remove the listing of the virtual machine in the machine list in VirtualBox, and not the files associated with it. The option to “Delete all files” will remove the files associated with the virtual machine, as well as the listing in the machine list itself.

Friday, October 25, 2013

101 Ways to Make Money on Facebook

If you want to make money through social media, then Facebook is definitely the place to start. It is the largest social network — and third most popular website — in the world. With billions of users, you’ll have no trouble finding an audience that will be interested in what you have to promote. In this guide, we’re going to look at specific tips you can apply to your Facebook marketing strategy to make money, as well as great resources that will help you make the best use of your time, inspire, and educate you so you can increase business revenue and/or personal income.
(By the way, you may also be interested in reading MonetizePros’ monetization guides on other social media sites: LinkedIn, Pinterest, Twitter and YouTube. And for even more monetization tips, sign up for the MonetizePros free email newsletter.)

Jump To Section:

listbuilding2Build Your Mailing List

Since most businesses make money from their mailing list, let’s look at some specific ways you can grow your mailing list on Facebook to increase your online income.
  1. Post new signup incentives (free e-books, reports, whitepapers, discounts, etc.) on your Facebook wall. For extra exposure, promote your post using the traditional Facebook Ads interface so you can target your post to the Facebook audience most likely to sign up and later become customers. Continue the ad as long as you continue getting signups.
  2. Look for opportunities in relevant Facebook groups to share your signup incentives. Start by joining groups where your target customers are active. Look at the question they post most frequently. Create signup incentives that answer those questions and leave a short, informative answer with a link to your squeeze page so people can learn more. .
  3. Install apps from your email service provider to put an opt-in form on your Facebook page as a custom tab. ESPs that offer Facebook apps include Aweber, MailChimp, GetResponse, Constant Contact, and iContact.
  4. Use the Woobox HTML tab app build an iframe on your Facebook page. You can easily add your mailing list squeeze page and have it show as one of your four custom tabs beneath your cover photo.
  5. Update your page’s cover photo to “point” to the custom tab on your Facebook page where people can sign up for your mailing list.
  6. Add a cover photo with a call to action to “click here” to get your free incentive. Make sure the photo’s description has a link to your squeeze page so that when people click on the cover photo, they can easily click through to your squeeze page. You can also make a shortened URL for your squeeze page (something easy to type like bit.ly/freeguide as opposed to bit.ly/Gu8sce2) and add it to your cover photo.
  7. Use the Custom Audience feature in the Facebook Ads Power Editor to target ads about your signup incentive to other email address lists you have access to like your customers, LinkedIn contacts, personal email contacts, etc. Note that you shouldn’t says something like “Thanks for being in my network on LinkedIn — come download this.” Don’t give away how you know people in your ad; let them just think they were “randomly” targeted.
  8. Use the Custom Audience feature in the Facebook Ads Power Editor to target ads for a new signup incentive to people who have unsubscribed from your mailing list.

sellingproducts1Sell Your Products

Do you sell physical or products, online or off? Here are some ways increase your sales using Facebook to turn your visitors and fans into paying customers.
  1. Announce new products on your Facebook page and promote the post using the traditional Facebook Ads interface so you can target your post to the Facebook audiences most likely to buy.
  2. Use the Custom Audience feature in the Facebook Ads Power Editor to target ads to your current customer base and mailing list to increase visibility for your new products.
  3. Add a custom tab to your Facebook page that lets you sell directly on Facebook, or that guides your Facebook fans from your page to your online store.
  4. Look for opportunities in relevant Facebook groups to promote your products. Start by joining groups where your target customers are active. Look for questions that can be answered with a mention of your product and answer them, preferably linking to your product’s landing page.
  5. Comment on blogs using the Facebook Comments plugin that your customers regularly read. Either comment as your Facebook page or comment as your personal profile after you have connected your page to your profile under the employment section of your personal profile’s about tab. You will get a link to your Facebook page with either option. Look for posts that allow you to casually mention your products in the comment so people will have reason to click through to your page.
  6. Update your cover photo with a photo or benefits list for your new / bestselling product. Make sure the photo’s description has a link to your product’s landing page so that when people click on the cover photo, they can easily click through to your landing page. You can also make a shortened URL for your landing page (something easy to type like bit.ly/ourproduct as opposed to bit.ly/Iso93lco) and add it to your cover photo.

leadgen1Generate Leads

If you sell high-end products or services, you might be more focused towards generating leads through Facebook. Here are some ways to attract them.
  1. Create content on your blog that is conversion-oriented for your business. If you offer SEO services to small businesses, write posts about SEO challenges for small businesses. Share these posts on your Facebook page and promote them using the traditional Facebook Ads interface so you can target the audiences likely to need your services.
  2. Look for opportunities in relevant Facebook groups to demonstrate your expertise. Start by joining groups where your target customers are active. Look for questions that are related to the services you offer, answer them, and casually mention that you offer services that could help with their issue.
  3. Lead a group on Facebook about the industry you offer services for. If you’re a freelance web designer, create a group for businesses who need small pieces of design advice. Just be sure your group’s goal is to attract customers, not colleagues.
  4. Link your business Facebook page to your Facebook personal profile using the employment section under the about tab. This way, potential customers who see your interactions throughout Facebook can learn more about your business.
  5. Find popular blogs in your industry that your potential customers read. Be an active participant in the wall posts of that blog’s Facebook page using your Facebook page. If you offer great advice to people, they’ll be more likely to contact you about your services.
  6. If you offer local services, look for business referral groups on Facebook in your region. Participating in these ail leave a huge ROI as people come to them to look for good businesses to work with. Even the smallest cities have them.
  7. If you are offering services to entrepreneurs or small business owners who manage their own Facebook page, consider sending a personalized message to their Facebook page about specific ways your services could help them. Skip the generic “I can help you build your Facebook marketing strategy” and go for “I noticed you don’t have a link to your website in your page’s short description — here’s how to do it.” Insert directions and then let them know you can help them with other aspects of their Facebook page if they are interested. Sending it to their Facebook page will help you bypass the “Other” message folder.

sellingbooks1Promote Your Books

If you’ve authored a book for sale (or as an incentive for mailing list signups), then you can promote it on Facebook. Here’s how.
  1. Create a cover photo for your book, both on your personal profile and your Facebook page. Include a call to action that points to the book website, an arrow that points down to a custom tab with a sample chapter that can be downloaded if people opt-in (which will put them in an autoresponder series to ultimately buy the book), etc.
  2. Create a Facebook page for your book itself so people can add it to books they’ve read. Better yet, add instructions in an image on how people can add your book to their favorite books on their personal profile.
  3. Create a group so people can come discuss the book. As the group grows, more people will become interested in joining and will lean more about the book.
  4. Join groups for book lovers so you can share the news about your book. Also join groups where people who would read your book are active.
  5. Start an interest list with the top books in your industry and include your book’s page in that list. Then promote it.
  6. Design some images with quotes from the book. While these aren’t as powerful on Facebook, they still get a lot of shares. Make sure a link to your book is early in the description with the image; specifically, make it a shortened URL after no more than 90 characters in your update.

affiliatemarketing1Market Affiliate Products

Another way to make money on Facebook is by promoting the products you are an affiliate for. Note that if you do share an affiliate link on Facebook, it is proper etiquette (and an FCC requirement) to disclose that the link is an affiliate link.
  1. Promote your blog post or video review of the affiliate product on your Facebook wall and promote that post using the traditional Facebook Ads interface to target the ad to people who are most likely to buy the product.
  2. Personally reach out to people who might be interested in buying this product. You will find these people in relevant groups and interacting on popular Facebook pages within the industry. For this to work, you have to be genuinely passionate about the product, willing to write personalized messages to individuals about why they should try it, and disclose that you are an affiliate (but that you’d promote it even if you weren’t). Make sure these are people you have interacted with in groups or on pages, and let them know you sent them a message so it doesn’t get lost in their other folder.
  3. Look for opportunities in relevant Facebook groups to promote the affiliate product. Start by joining groups where the product’s target customers are active. Look for questions that open the door to sharing your review post or video. If you’re promoting a WordPress theme, look for any group where people are asking what theme is best for their blog or business, then passionately suggest the theme you’re promoting (and also disclose that you’re an affiliate).

jobsearch1Look for a Job

If you’re not making what you want at your current job, then you might be in the market for a new one. Here are some ways to use Facebook to help increase the odds of getting hired.
  1. Make your Facebook personal profile as professional as possible. Regardless of the legality of employers checking up on potential job candidates on Facebook, they still do. You don’t want someone to see your latest wild weekend in Vegas photos or status updates where you complain about your job, past or current.
  2. If you know of a company that is hiring, and you can find people from that company in public Facebook groups using Graph Search (try Groups that John Smith Belongs To), join those groups and start interacting with those people. The familiarity could help you during the interview process as you will be demonstrating your expertise with potential interviewers.
  3. Find a common interest with your future boss or interviewer. Many Facebook personal profiles have some public information; see what you can find before you go for your interview and brush up on it so you can casually throw it around in conversation. The connection will help you be more memorable.
  4. Turn your profile and/or page into a portfolio. Add images that represent your best work in a specific album. If applicable, add a link to the description for the image.

facebookappsFacebook Apps & Integrations

If you want to make money directly off of Facebook, you will want to turn your Facebook page into a sales machine. Here are some apps that allow you to sell from your Facebook page or easily lead your Facebook fans to your online store.
  1. Beetailer. Helps you import your existing online store into Facebook.
  2. Show & Sell. Sell your products or services on Facebook with an easy-to-configure social mini-store.
  3. Storefront Social. Enables businesses to showcase their products or services on their Facebook page.
  4. ShopTab. One of the leading Facebook store applications.
  5. Ecwid. Formerly Payvment, an embeddable centrally managed storefront that works on Facebook, WordPress, Joomla, Drupal, Squarespace, and additional platforms.
  6. Integrations with Facebook. Facebook store applications and integrations for Shopify users.
  7. StoreYa. Facebook store application and integration for Magento users.
Another way to encourage sales is by offering deals, coupons, and discounts. Here are some apps that make it easy to give your fans exclusives that will drive them to buy.
  1. Deal Share. Create and launch a viral deal on your Facebook Page where you can set the number of registrations required to unlock a group discount.
  2. Exclusive. Visitors unlock a “fan exclusive” download by sharing a wall post .
  3. Fan Coupon. Convert visitors into fans of your Facebook page by rewarding them with an exclusive coupon or invitation to a special event.
  4. Coupons & Vouchers. Create fan-only coupons with unique one per user custom coupon codes.
  5. Deals. Require payment via Paypal to access an offer.
  6. Group Deals. Create coupons that are available only after a certain number of people request the coupon.
  7. Facebook Coupon App. Reward your fans and generate sales revenue with Facebook exclusive offers.
For businesses who just want leads, there are some apps that let Facebook visitors contact you for more information, without having to trust them to find your message button.
  1. InlineVision Contact Form. Give fans an easy way to contact you with our Contact Form for Facebook and get the submissions delivered directly to your email Inbox.
  2. Pagemodo Contact Form. A contact form is a quick and easy way for visitors and fans to contact you. They fill in information on your tab and you’ll get alerted with an email.
  3. North Contact. North Contact is a free social CRM extension for North Social’s apps. Perfect for creating user forms, list management, as well as outbound emails and autoresponders.

facebooktoolsRecommended Tools

If you want to make money online, you need to get efficient with your time management. The following tools will help you spend less time posting updates and more time on revenue generating tasks.
  1. Buffer. Allows you to create a custom schedule for posting updates to your Facebook profile or page. Add posts to your Buffer and they will automatically be assigned to the next open time slot.
  2. Post Planner. Allows you to schedule posts to your pages and groups. Also gives you ideas of what to write when you don’t know what to post.
  3. HootSuite. Allows you to schedule posts to your profile and page. Also allows you to monitor your newsfeed in one dashboard.
Another thing you could use is an analytics tool that brings your Facebook Insights together with your other data. Here are some good ones to try.
  1. SumAll. Lets you view your Facebook Insights alongside business data from a variety of sources in a graph so you can see how a spike in Facebook activity affects your business.
  2. Cyfe. Prefer dashboards? Cyfe lets you create dashboards with business data from a variety of sources.
  3. Social Report. If you’d rather get your Facebook Insights and activity delivered to your inbox.
  4. Rival IQ. For those who need to constantly monitor their competitors, Rival IQ lets you see your competitor’s Facebook page description and activity levels. It will also notify you when any significant changes are made to the page.

monetizationFurther Reading: Facebook Monetization

Want some more Facebook monetization tips? Check out tips from more experts in the social media field.
  1. Building & Monetizing Facebook Fan Pages. Think Facebook marketing is too difficult or not worth the time? Use these easy tips on building and monetizing Facebook fan pages.
  2. Yes, You Can Monetize Your Own Social Data–Here’s How. Several entrepreneurs are attempting to give social network users new ways to make money from their thoughts, words–even their identity. Is this the future of the middle class?
  3. Show Me the Money! 5 Ways to Monetize Your Facebook Fan Page. How your PR agency can monetize a Facebook fan page.
  4. Monetize a Facebook Page in 7 Easy Ways. Small businesses, start-ups and franchises are all monetizing around Facebook, but you can’t figure out how to do it yourself. Monetize a Facebook Page in 7 easy steps.
  5. How to Monetize Your Facebook Fan Page. You will find a quick video that will teach you some ways to monetize your Facebook fan page, how you can make money on Facebook, even without a list!
  6. How to Customize, Optimize and Monetize Your Facebook Fan Page. Here’s a quick video to show you some of the features you can add to optimize your fan page and start generating more leads, engaging with more potential clients and building more trust.

successstoriesFurther Reading: Facebook Success Stories

Need some inspiration about how Facebook can help your business? Check out these collections of success stories.
  1. Facebook Success Stories. Meet small businesses across the U.S. who are finding success on Facebook.
  2. 3 Small Businesses that are Successful on Facebook. What does small business Facebook success look like? The stories of a bakery, a laser clinic, and a golf club share real life Facebook success stories.
  3. 9 Facebook Marketing Success Stories You Should Model. Improve your Facebook marketing: Study the innovative Facebook marketing practices used by these companies.
  4. 3 Facebook Commerce Success Stories. Here are three small businesses that have successfully integrated stores into their Facebook Pages, and what they’re learning about the process.
  5. Free ebook: 15 B2B Marketing Facebook Success Stories. we compiled 15 mini-case studies of successful B2B Facebook pages.
  6. Facebook Success Stories. Every day, brands around the world are inspired to bring creative marketing ideas to life on Facebook in ways that have a real impact on their business.

listbuilding1Further Reading: Building Your List with Facebook

We all want a larger, targeted list. These posts will give you even more insight into how to grow yours.
  1. Using Facebook Ads to Grow Your Mailing List. Recently, we have covered how to track your mailing list signups using Google Analytics as well as how to grow your B2B list using LinkedIn Ads. Now, let’s look at how any business — B2B or B2C — can use Facebook ads to increase mailing list subscribers.
  2. 6 Steps to Building Your Email List With Facebook. Email is the bridge that Facebook fans join to becoming a donor. This means having a smart email marketing strategy, in addition to a smart Facebook strategy.
  3. How to Engage Your Audience and Grow Your E-mail List with Facebook Contests. Andrea Vahl stops by to teach us some little known secrets about how to build an email list through the use of Facebook contests and sweepstakes.
  4. How to Use Facebook to Build Your Email List. What follows are a six effective tips to help you grow your email list using Facebook.
  5. 4 Ways to Build Your Email List With Facebook Timeline. Timeline does not allow brand pages to set a custom landing page. That means it’s time to get creative in drawing attention to your email signup form.

sellingproducts2Further Reading: Selling Products on Facebook

When it comes to sales, every business has to find the right style for themselves and their target customers. Here are some more strategies you can use to increase product sales.
  1. Apps to Help You Start Selling on Facebook — Now. Consider these four options for selling your wares on the world’s biggest social network.
  2. How to Use Facebook to Sell Your Products and Services. Learn how to sell products on your Facebook page and build an online store with third-party landing page apps.
  3. The Social Storefront – How to Sell Your Products and Services on Facebook. If your small business is interested in exploring this new revenue stream, here are some tips to help you get started building your social storefront.
  4. 6 Tips for Selling Directly on Facebook. Small businesses may stand the best chance of realizing Facebook’s potential as a social commerce platform. Here are six tips that may help.
  5. The Importance of Facebook Commerce for Ecommerce Businesses. Using F-Commerce to sell your products on Facebook. Facebook commerce allows you to market & sell your products using Facebook applications. Read about these different apps and their strengths.

leadgen2Further Reading: Generating Leads on Facebook

If you need leads from Facebook, these social media experts can help you get more.
  1. 6 Ways To Capture Leads From Facebook Pages. Do you use Facebook to capture leads for your business? Amanda Webb stops by to tell us six ways that you can do it!
  2. 4 Steps for Getting More Leads from Facebook. Here are four steps to generating more leads from Facebook, suggested by the firm Optify which provides digital marketing software.
  3. How to Use Facebook Ads to Get More Quality Leads and Attract More Blog Traffic. Here’s a how to create a custom app strategy while using Facebook ads. The goal is to launch a custom advertising campaign to see some real action on your Page.
  4. 5 Foolproof Ways to Generate Leads From Facebook. Leads from Facebook you say Darn right The value of a Facebook presence isn’t limited to a way for businesses to interact with prospects fans and customers.
  5. How to Get 10 Leads a Day on Facebook. These methods include creating a landing page for your business Facebook page, advertising on and off Facebook and providing interactive content on your page.

sellingbooks2Further Reading: Promoting Books on Facebook

If you’re an author, be sure to read these resources on additional ways to market your book.
  1. Facebook Marketing Tactics for Book and Media Businesses. No matter what your business or your niche, you can use a site like Facebook to tap directly into the market and to find that vibrant niche. You can compete on a larger level even with a smaller niche.
  2. 8 Essential Tips for Marketing Your Book on Facebook. Facebook is a bit of a game. You have to understand the underlying rules to win, but the rules aren’t obvious. Here are 8 things you need to know.
  3. Advanced Facebook Marketing for Books and Authors. The 19 Hot Money Spots on Facebook that every author and publisher needs to know about.
  4. How To Use Facebook Advertising To Market Your Book. Create targeted advertising to the smallest budget using Facebook advertising for your book. Here’s how to do it.
  5. 10 Facebook Marketing Tips to Sell Your Book. While you may be more comfortable with traditional marketing, it yields far fewer results for time invested. You just need to get a social media plan going that limits your time on the ones that pay off.

affiliatemarketing2Further Reading: Affiliate Marketing on Facebook

Affiliate marketing experts offer additional advice on how to use Facebook to increase your affiliate earning potential.
  1. How To Do Affiliate Marketing Launches with Facebook. How you can use Facebook during the next affiliate launch you participate in.
  2. Using Facebook to Increase Affiliate Sales. Tired of using email marketing, squeeze pages, product reviews, inbound marketing for your affiliate sales? Here’s how you can use Facebook to boost your affiliate sales.
  3. How To Use Facebook For Affiliate Marketing. In order to get big money, you will have to use Facebook Ads to drive traffic to a page, that will then send them to the affiliate link via an app called Just Redirect.
  4. Affiliate Marketing and Facebook: Simple Tips to Make Them Tick. Remember when going into Facebook, that even a little loss is a good learning experience. Take what you learn from your first campaigns and apply them to later campaigns. You are investing in data and personal experience. Use it.
  5. How to Promote Affiliate Products on your Facebook Page. There are a couple of considerations when you decide to promote affiliate products on your Facebook Fan Page. Watch my tutorial to see how it’s done.

jobsearch2Further Reading: Job Hunting on Facebook

Career and personal branding experts offer additional insights into how you can use Facebook to further your career search.
  1. Facebook Graph Search for Job Searching. Job seekers can use Graph Search to enhance their job search. Here’s how.
  2. Prepping Your Facebook For A Job Hunt. How you present yourself on Facebook can (and will) determine your chances of being hired.
  3. 5 Ways to Job Hunt Using Facebook. As Facebook continues to roll out Graph Search–making it easier for recruiters to find you–here’s a look at five Facebook apps that put you in control of finding a new job.
  4. 5 Ways to use Facebook for your Job Search. Let’s crack on with the 5 ways to use Facebook to get hired.
  5. Social Media 101: Facebook and Job Hunting. How you can use Facebook to your advantage in finding a job.
  6. Facebook Is The Perfect Place To Job Hunt, Says Facebook. It turns out, you can land a job through your strongest relationships with friends over weak links.

Bottom Line

Facebook offers a lot of opportunities for people to increase their income, whether they are business owners, authors, or employees. There are also tons of amazing articles that can help you further develop your Facebook income-generating skills. We hope you enjoy the tips and resources!

Thursday, October 24, 2013

Friday, October 18, 2013

Bỏ qua Start Screen Windows 8.1?

http://cdn3.sbnation.com/assets/3405767/winuistartscreen.jpg

Khi Microsoft phát hành Windows 8, họ thêm vào Star Screen theo phong cách của Windows Phone. Start Screen liệt kê các chương trình đã cài đặt trên Windows và được Microsoft sử dụng để thay thế Start Menu trong các phiên bản Windows trước đó.

Người dùng Windows 8 phàn nàn về việc khởi động trực tiếp vào màn hình Start Screen. Sau khi đăng nhập vào Windows, Start Screen xuất hiện đầu tiên thay vì giao diện Desktop quen thuộc và để trở về giao diện Desktop, cần click vào biểu tượng Desktop trên Start Screen.

Trong Windows 8, Microsoft đã không cung cấp tùy chọn nào để bỏ qua hoặc vô hiệu hóa Start Screen để truy cập trực tiếp vào Desktop và người dùng phải dùng tiện ích của hãng thứ ba như Classic Shell để thực hiện việc đó.

Trong phiên bản Windows 8.1, Microsoft đã thêm lựa chọm để bỏ qua Start Screen và khởi động trực tiếp vào Desktop. Khi sử dụng lựa chọn này, sau khi đăng nhập sẽ không xuất hiện Start Screen nữa.

Để bỏ qua Start Screen, thực hiện theo các bước sau:

- Chuột phải vào Taskbar, chọn Properties.

image

- Sau khi chọn Properties, nó sẽ mở hộp thoại Taskbar and Navigation properties. Trên hộp thoại này, lựa chọn tab Navigation, sau đó chọn “When I sign or close all apps on a screen, go to the desktop instead of Start”, nhắp Apply để xác nhận việc thay đổi.

image

Khởi động lại máy tính để kiểm tra kết quả.

Thursday, October 17, 2013

NoMachine phát hành phiên bản 4.0

Thông thường các máy chủ Linux ít khi cài đặt giao diện đồ họa (GUI) và người quản trị từ xa một máy chủ Linux thông qua lệnh. Tuy nhiên có một số người quản trị Linux vẫn cài đặt GUI trên máy chủ. Khi máy chủ sử dụng GUI, để điều khiển từ xa thông qua GUI, có thể cài đặt VNC Server trên máy chủ đó. Tuy nhiên bạn cũng có thể cài đặt công cụ NoMachine để thực hiện việc truy cập từ xa đến giao diện đồ họa.

NoMachine là công cụ remote desktop tương tự nhu VNC. Nó được quảng cáo là nhanh hơn VNC do sử dụng giao thức riêng NX và cho người quản trị có cảm giác như đang ngồi phía trước máy chủ!

NoMachine đã giới thiệu phiên bản mới nhất 4.0, hỗ trợ các hệ điều hành Windows, Linux, Mac OSX. NoMachine cho iOS, Android đang thử nghiệm bản alpha.

NoMachine phiên bản 4.0 có một số tính năng mới sau:

- Thay đổi giao diện so với bản 3.5. Bản cài đặt giờ một file duy nhất không tách thành 3 file nxserver, nxclient, nxnode như bản 3.5.

- Chia sẻ folder, USB device, printer với máy remote.

- Capture video

Phiên bản miễn phí giới hạn 02 connection, nếu muốn nhiều connection cùng lúc cần phải mua bản Enterprise.

Download và cài đặt trên máy chủ Centos

Link Download: Download NoMachine

NoMachine cho Linux được phân phối dạng rpm, deb hoặc tar.gz. Dạng phân phối rpm cho hệ điều hành Redhat, Centos, Fedora. Dạng deb cho các hệ điều hành dựa trên Debian như Ubuntu, LinuxMint. Dang source tar.gz cho các bản phân phối Linux khác.

Download và cài đặt trên Redhat, Centos bản 32bit:

# wget http://web04.nomachine.com/download/4.0/Linux/nomachine_4.0.352_1_i686.rpm

# rpm -ivh nomachine_4.0.352_1_i686.rpm 

Download và cài đặt trên Redhat, Centos bản 64bit:

# wget http://web04.nomachine.com/download/4.0/Linux/nomachine_4.0.352_1_x86_64.rpm

# rpm -ivh nomachine_4.0.352_1_x86_64.rpm

Trên máy tính truy cập từ xa cũng phải cài bản NoMachine này.

Wednesday, October 16, 2013

VirtualBox phát hành phiên bản 4.3

image
VirtualBox là phần mềm ảo hóa đầy đủ. VirtualBox có thể cài trên máy host sử dụng các hệ điều hành Windows, Linux, Solaris và mô phỏng các máy ảo WIndows, Linux, Solaris.
VirtualBox cũng tương tự như các phần mềm VMWare, QEMU, VirtualPC, …
VirtualBox đã phát hành phiên bản 4.3 với một số tính năng mới sau:
- Hỗ trợ các máy ảo Windows 8.1, Windows Server 2012 R2, Mac OS X 10.9.
- Chỉnh lại code VT-x và AMD-V để sửa lỗi và tăng hiệu suất.
- Thêm mô phỏng SCSI CDROM bao gồm việc hỗ trợ boot.
- Thêm mô phỏng USB touch device.
- …
Download phiên bản 4.3: Download VirtualBox
Có thể download thêm gói Extension Pack hỗ trợ thiết bị USB 2.0, VirtualBox RDP và PXE boot cho card mạng Intel. Gói Extension Pack cài sau khi cài VirtualBox.

13 Apache Web Server Security and Hardening Tips

Apache Security Tips

We all are very familiar with Apache web server, it is a very popular web server to host your web files or your website on the web. Here are some links which can help you to configure Apache web server on your Linux box.

Here in this tutorial, I’ll cover some main tips to secure your web server. Before you apply these changes in your web server, you should have some basics of the Apache server.

  1. Document root Directory: /var/www/html or /var/www
  2. Main Configuration file: /etc/httpd/conf/httpd.conf (RHEL/CentOS/Fedora) and /etc/apache/apache2.conf (Debian/Ubuntu).
  3. Default HTTP Port: 80 TCP
  4. Default HTTPS Port: 443 TCP
  5. Test your Configuration file settings and syntax: httpd -t
  6. Access Log files of Web Server: /var/log/httpd/access_log
  7. Error Log files of Web Server: /var/log/httpd/error_log
1. How to hide Apache Version and OS Identity from Errors

When you install Apache with source or any other package installers like yum, it displays the version of your Apache web server installed on your server with the Operating system name of your server in Errors. It also shows the information about Apache modules installed in your server.

Show Apache Version

Show Apache Version

In above picture, you can see that Apache is showing its version with the OS installed in your server. This can be a major security threat to your web server as well as your Linux box too. To prevent Apache to not to display these information to the world, we need to make some changes in Apache main configuration file.

Open configuration file with vim editor and search for “ServerSignature“, its by default On. We need to Off these server signature and the second line “ServerTokens Prod” tells Apache to return only Apache as product in the server response header on the every page request, It suppress the OS, major and minor version info.

# vim /etc/httpd/conf/httpd.conf (RHEL/CentOS/Fedora)
# vim /etc/apache/apache2.conf (Debian/Ubuntu)


ServerSignature Off
ServerTokens Prod


# service httpd restart (RHEL/CentOS/Fedora)
# service apache2 restart (Debian/Ubuntu)


Hide Apache Version


Hide Apache Version


2. Disable Directory Listing


By default Apache list all the content of Document root directory in the absence of index file. Please see the image below.


Apache Directory ListingApache Directory Listing


We can turn off directory listing by using Options directive in configuration file for a specific directory. For that we need to make an entry in httpd.conf or apache2.conf file.


<Directory /var/www/html>
Options -Indexes
</Directory>


Hide Apache Directory ListingHide Apache Directory Listing


3. Keep updating Apache Regularly


Apache developer community is continuously working on security issues and releasing its updated version with new security options. So It is always recommended to use the latest version of Apache as your web server.


To check Apache version: You can check your current version with httpd -v command.


# httpd -v
Server version: Apache/2.2.15 (Unix)
Server built: Aug 13 2013 17:29:28


You can update your version with the following command.


# yum update httpd
# apt-get update apache2


It is also recommended to keep your Kernel and OS updated to the latest stable releases if you are not running any specific application which works only on specific OS or Kernel.


4. Disable Unnecessary Modules


It’s always good to minor the chances of being a victim of any web attack. So it’s recommended to disable all those modules that are not in use currently. You can list all the compiled modules of web server, using following command.


# grep LoadModule /etc/httpd/conf/httpd.conf

# have to place corresponding `LoadModule' lines at this location so the
# LoadModule foo_module modules/mod_foo.so
LoadModule auth_basic_module modules/mod_auth_basic.so
LoadModule auth_digest_module modules/mod_auth_digest.so
LoadModule authn_file_module modules/mod_authn_file.so
LoadModule authn_alias_module modules/mod_authn_alias.so
LoadModule authn_anon_module modules/mod_authn_anon.so
LoadModule authn_dbm_module modules/mod_authn_dbm.so
LoadModule authn_default_module modules/mod_authn_default.so
LoadModule authz_host_module modules/mod_authz_host.so
LoadModule authz_user_module modules/mod_authz_user.so
LoadModule authz_owner_module modules/mod_authz_owner.so
LoadModule authz_groupfile_module modules/mod_authz_groupfile.so
LoadModule authz_dbm_module modules/mod_authz_dbm.so
LoadModule authz_default_module modules/mod_authz_default.so
LoadModule ldap_module modules/mod_ldap.so
LoadModule authnz_ldap_module modules/mod_authnz_ldap.so
LoadModule include_module modules/mod_include.so
LoadModule log_config_module modules/mod_log_config.so
LoadModule logio_module modules/mod_logio.so
LoadModule env_module modules/mod_env.so
LoadModule ext_filter_module modules/mod_ext_filter.so
....


Above is the list of modules that are enabled by default but often not needed: mod_imap, mod_include, mod_info, mod_userdir, mod_autoindex. To disable the particular module, you can insert a “#” at the beginning of that line and restart the service.


5. Run Apache as separate User and Group


With a default installation Apache runs its process with user nobody or daemon. For security reasons it is recommended to run Apache in its own non-privileged account. For example: http-web.


Create Apache User and Group


# groupadd http-web
# useradd -d /var/www/ -g http-web -s /bin/nologin http-web


Now you need to tell Apache to run with this new user and to do so, we need to make an entry in /etc/httpd/conf/httpd.conf and restart the service.


Open /etc/httpd/conf/httpd.conf with vim editor and search for keyword “User” and “Group” and there you will need to specify the username and groupname to use.


User http-web
Group http-web


6. Use Allow and Deny to Restrict access to Directories


We can restrict access to directories with “Allow” and “Deny” options in httpd.conf file. Here in this example, we’ll be securing root directory, for that by setting the following in the httpd.conf file.


<Directory />
Options None
Order deny,allow
Deny from all
</Directory>


  1. Options “None” – This option will not allow users to enable any optional features.


  2. Order deny, allow – This is the order in which the “Deny” and “Allow” directives will be processed. Here it will “deny” first and “allow” next.


  3. Deny from all – This will deny request from everybody to the root directory, nobody will be able to access root directory.


7. Use mod_security and mod_evasive Modules to Secure Apache


These two modules “mod_security” and “mod_evasive” are very popular modules of Apache in terms of security.


Mod_security


Where mod_security works as a firewall for our web applications and allows us to monitor traffic on a real time basis. It also helps us to protect our websites or web server from brute force attacks. You can simply install mod_security on your server with the help of your default package installers.


Install mod_security on Ubuntu/Debian


$ sudo apt-get install libapache2-mod-security
$ sudo a2enmod mod-security
$ sudo /etc/init.d/apache2 force-reload


Install mod_security on RHEL/CentOS/Fedora/


# yum install mod_security
# /etc/init.d/httpd restart


Mod_evasive


mod_evasive works very efficiently, it takes one request to process and processes it very well. It prevents DDOS attacks from doing as much damage. This feature of mod_evasive enables it to handle the HTTP brute force and Dos or DDos attack. This module detects attacks with three methods.


  1. If so many requests come to a same page in a few times per second.


  2. If any child process trying to make more than 50 concurrent requests.


  3. If any IP still trying to make new requests when its temporarily blacklisted.


mod_evasive can be installed directly from the source. Here, we have an Installation and setup guide of these modules which will help you to set up these Apache modules in your Linux box.


Protect Apache using Mod_Security and Mod_evasive


8. Disable Apache’s following of Symbolic Links


By default Apache follows symlinks, we can turn off this feature with FollowSymLinks with Options directive. And to do so we need to make the following entry in main configuration file.


Options -FollowSymLinks


And, if any particular user or website need FollowSymLinks enable, we can simply write a rule in “.htaccess” file from that website.


# Enable symbolic links
Options +FollowSymLinks


Note: To enable rewrite rules inside “.htaccess” file “AllowOverride All” should be present in the main configuration globally.


9. Turn off Server Side Includes and CGI Execution


We can turn off server side includes (mod_include) and CGI execution if not needed and to do so we need to modify main configuration file.


Options -Includes
Options -ExecCGI


We can do this for a particular directory too with Directory tag. Here In this example, we are turning off Includes and Cgi file executions for “/var/www/html/web1” directory.


<Directory "/var/www/html/web1">
Options -Includes -ExecCGI
</Directory>


Here are some other values with can be turned On or off with Options directive.


  1. Options All – To enable All options at once. This is the default value, If you don’t want specify any values explicitly in Apache conf file or .htaccess.


  2. Options IncludesNOEXEC – This option allows server side includes without the execute permission to a command or cgi files.


  3. Options MultiViews – Allows content negotiated multiviews with mod_negotiation module.


  4. Options SymLinksIfOwnerMatch – It’s similar to FollowSymLinks. But, this will follow only when the owner is the same between the link and the original directory to which it is linked.


10. Limit Request Size


By default Apache has no limit on the total size of the HTTP request i.e. unlimited and when you allow large requests on a web server its possible that you could be a victim of Denial of service attacks. We can Limit the requests size of an Apache directive “LimitRequestBody” with the directory tag.


You can set the value in bytes from 0 (unlimited) to 2147483647 (2GB) that are allowed in a request body. You can set this limit according to your site needs, Suppose you have a site where you allows uploads and you want to limit the upload size for a particular directory.


Here in this example, user_uploads is a directory which contains files uploaded by users. We are putting a limit of 500K for this.


<Directory "/var/www/myweb1/user_uploads">
LimitRequestBody 512000
</Directory>


11. Protect DDOS attacks and Hardening


Well, it’s true that you cannot completely protect your web site from DDos attacks. Here are some directives which can help you to have a control on it.


  1. TimeOut : This directive allows you to set the amount of time the server will wait for certain events to complete before it fails. Its default value is 300 secs. It’s good to keep this value low on those sites which are subject to DDOS attacks. This value totally depends on kind of request you are getting on your website. Note: It could pose problems with come CGI scripts.


  2. MaxClients : This directive allows you to set the limit on connections that will be served simultaneously. Every new connection will be queued up after this limit. It is available with Prefork and Worker both MPM. The default value of it is 256.


  3. KeepAliveTimeout : Its the amount of time the server will wait for a subsequent request before closing the connection. Default value is 5 secs.


  4. LimitRequestFields : It helps us to set a limit on the number of HTTP request’s header fields that will be accepted from the clients. Its default value is 100. It is recommended to lower this value if DDos attacks are occurring as a result of so many http request headers.


  5. LimitRequestFieldSize : It helps us to set a size limit on the HTTP Request header.


12. Enable Apache Logging


Apache allows you to logging independently of your OS logging. It is wise to enable Apache logging, because it provides more information, such as the commands entered by users that have interacted with your Web server.


To do so you need to include the mod_log_config module. There are three main logging-related directives available with Apache.


  1. TransferLog: Creating a log file.


  2. LogFormat : Specifying a custom format.


  3. CustomLog : Creating and formatting a log file.


You can also use them for a particular website it you are doing Virtual hosting and for that you need to specify it in the virtual host section. For example, here is the my website virtual host configuration with logging enabled.


<VirtualHost *:80>
DocumentRoot /var/www/html/example.com/
ServerName www.example.com
DirectoryIndex index.htm index.html index.php
ServerAlias example.com
ErrorDocument 404 /story.php
ErrorLog /var/log/httpd/example.com_error_log
CustomLog /var/log/httpd/example.com_access_log combined
</VirtualHost>


13. Securing Apache with SSL Certificates


Last, but not the least SSL certificates, you can secure your all the communication in an encrypted manner over the Internet with SSL certificate. Suppose you have a website in which people login by proving their Login credentials or you have an E- Commerce website where people provides their bank details or Debit/Credit card details to purchase products, by default your web server send these details in plain – text format but when you use SSL certificates to your websites, Apache sends all this information in encrypted text.


You can purchase SSl certificates from So many different SSL providers like namecheap.com. If you are running a very small web business and do not willing to purchase an SSL certificate you can still assign a Self signed certificate to your website. Apache uses the mod_ssl module to support SSL certificate.


# openssl genrsa -des3 -out example.com.key 1024
# openssl req -new -key example.com.key -out exmaple.csr
# openssl x509 -req -days 365 -in example.com.com.csr -signkey example.com.com.key -out example.com.com.crt


Once your certificate has been created and signed. Now you need to add this in Apache configuration. Open main configuration file with vim editor and add the following lines and restart the service.


<VirtualHost 172.16.25.125:443>
SSLEngine on
SSLCertificateFile /etc/pki/tls/certs/example.com.crt
SSLCertificateKeyFile /etc/pki/tls/certs/example.com.key
SSLCertificateChainFile /etc/pki/tls/certs/sf_bundle.crt
ServerAdmin ravi.saive@example.com
ServerName example.com
DocumentRoot /var/www/html/example/
ErrorLog /var/log/httpd/example.com-error_log
CustomLog /var/log/httpd/example.com-access_log common
</VirtualHost>


Open up your browser, type https://example.com, and you will be able to see the new self-signed certificate.


These are few security tips that you can use to secure your Apache web server installation. For more useful security tips and ideas, see the official online documentation of Apache HTTP Server.


Link gốc: 13 Apache Web Server Security and Hardening Tips

Twitter Delicious Facebook Digg Stumbleupon Favorites More

 
Design by Free WordPress Themes | Bloggerized by Lasantha - Premium Blogger Themes | Powerade Coupons