

 4:38 PM
 dao viet dung

Sau thời gian dài hoạt động, Firefox chiếm dụng rất nhiều dung lượng lưu trữ của ổ cứng, do cơ chế tạo ra những tập tin WAL (như cookies.sqlite-wal) để tối ưu hiệu suất. Làm thế nào lấy lại phần không gian này?


Replace these every slider sentences with your featured post descriptions.Go to Blogger edit html and find these sentences.Now replace these with your own descriptions.
Replace these every slider sentences with your featured post descriptions.Go to Blogger edit html and find these sentences.Now replace these with your own descriptions.
Replace these every slider sentences with your featured post descriptions.Go to Blogger edit html and find these sentences.Now replace these with your own descriptions.

Thông thường lập trình android sử dụng máy giả lập android đi kèm Android SDK. Tuy nhiên máy giả lập này khởi động lâu và độ phản hồi chậm. Để khắc phục hạn chế trên, sử dụng AndroVM.
AndroVM thực chất là máy ảo chạy trên nền VirtualBox. Thực hiện theo các bước sau:
1) Download and install VirtualBox. This is required in order to install Android (or any other operating system) without damaging your system or messing with BIOS, which can be time-consuming, and/or dangerous to the system..
2) Download AndroVM (click one of the links in this step to download their respective .ova file). For beginners, please choose the version complete with Adobe Flash Player and the Google Play store. If you are an advanced user (or don’t want Google Play as the Android Appstore), you may download the version without the Google Play store.
3) Navigate to the folder where you downloaded either .ova file, and double-click (open) it. You must have VirtualBox installed before opening the file, or it will not open properly. If you have VirtualBox installed, you should see something similar to the picture below:

As pointed out in the picture, you should make sure that the RAM (Random Access Memory) listed is 1/2 or less of the RAM available on your computer. For example, if you have 4 GB of RAM (4096 MB of RAM), the RAM listed in the dialog box should be 2048 MB (2GB) or less. If more than half of the available RAM on your computer is listed in the dialog box, then when you start the Android VM, your host computer (the computer you’re running VirtualBox on) will excessively swap out memory on your hard disk, which will lock up the host computer, and make it unstable.
4) Once you’re sure you have the right settings, click Import.
You may see a “Importing appliance” window, just wait until it finishes.
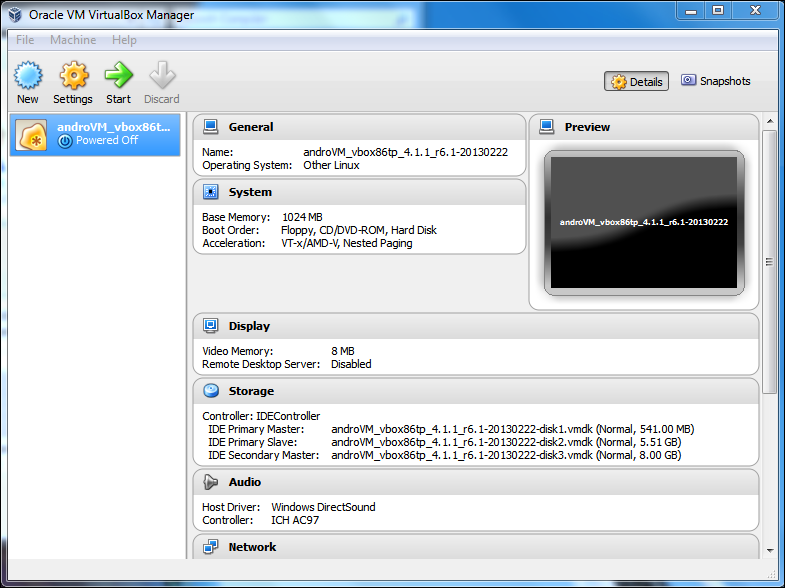
You should now see a screen like this:
5) You should now recall which version of AndroVM you have downloaded. If you have downloaded the AndroVM version with Flash and Google Play built into it, please skip to step 6, as you do not need to follow step 5. However,if you have downloaded the version without Google Play, please complete this step. As you may (or may not) know, if you want to download Android apps, but you don’t have Google Play, you have to get them from some other source. You can either a) search the Web for an .apk package that contains your app, which may or may not work; b) download another app store that replaces Google Play, and evade the direct .apk web search. Either way, you need to make a modification to Android in order to do this without Google Play, but we will save this for step 6.
Anyway, if you prefer to use the direct .apk search method (not recommended), skip this step, and go to step 6. However, it is recommended that you download an app store, so you may want to continue with this step.
6) Depending on which version of AndroVM you downloaded, you may need to configure your Android device differently. Either way, you should begin the virtual machine by clicking the Start button, as shown below in the yellow box:

You should now see the image below (it will be in color):

At this point, it may be helpful to put the VM in full screen (click View -> Switch to Fullscreen, click “Switch” if you see a dialog box). If you ever want (or need) to pause the VM, click the Machine menu, and then “Pause”. The VM screen will be in grayscale (black and white) if it is paused. To unpause the VM, repeat the steps.
Anyway, the VM screen should show the above image for a few seconds, and then flash into what looks like a command prompt (Linux terminal in this case). You will see a few dialog boxes. Just read them through thoroughly, click “Do not show me this message again” or something similar if you choose to not have them show again, and then click OK. Next, you should see the typical Android logo flashing a few times (see below screenshot).

Please go to step 6a or 6b, depending on which version of AndroVM you have downloaded.
6a) If you downloaded the AndroVM version without Google Play and Flash Player, you will see the following screen (or something similar):

You should know what to do at this point: click and hold the padlock, and move your mouse to the unlocked padlock so that there is a white circle around it, and then let go of the mouse button. Now, you will see the Android home screen:

Do you remember the appstore .apk file we mentioned before? Good, because you need to install it! You need to configure a setting before installation can begin. However, this setting only needs to be configured once. Therefore, if you’ve completed this step already, you need not repeat it.
First, click the circle with 6 dots in in on the right panel. You’ll see a list of apps. Click “Settings”. You should be in the settings panel now. It looks like this:

Scroll down to the “Personal” section, and click the “Security” listing as shown in the picture above.
Next, find “Unknown sources”, and click on it so
it’s checked, as seen below:

You will get a prompt as shown below, read it and click OK.

Next, tap the Home key on your keyboard. This will take you to the Android home screen, which you will need. Click the circle with 6 dots, to get to the app list. Click the Browser app. Now, navigate to Google Drive, SkyDrive, or wherever you stored that file. Open the file in your cloud service from the mobile Android browser and not the host computer’s browser. As soon as you open it, you should see a gray bar at the bottom that reads “Starting download…”. You should see a little download icon in the far left of the top notification bar of Android. The icon is circled in red below.

Next, pull down the notifications bar (click and drag the bar downwards, like in the below pic). When it’s opened, click on the .apk file, as shown in the picture:
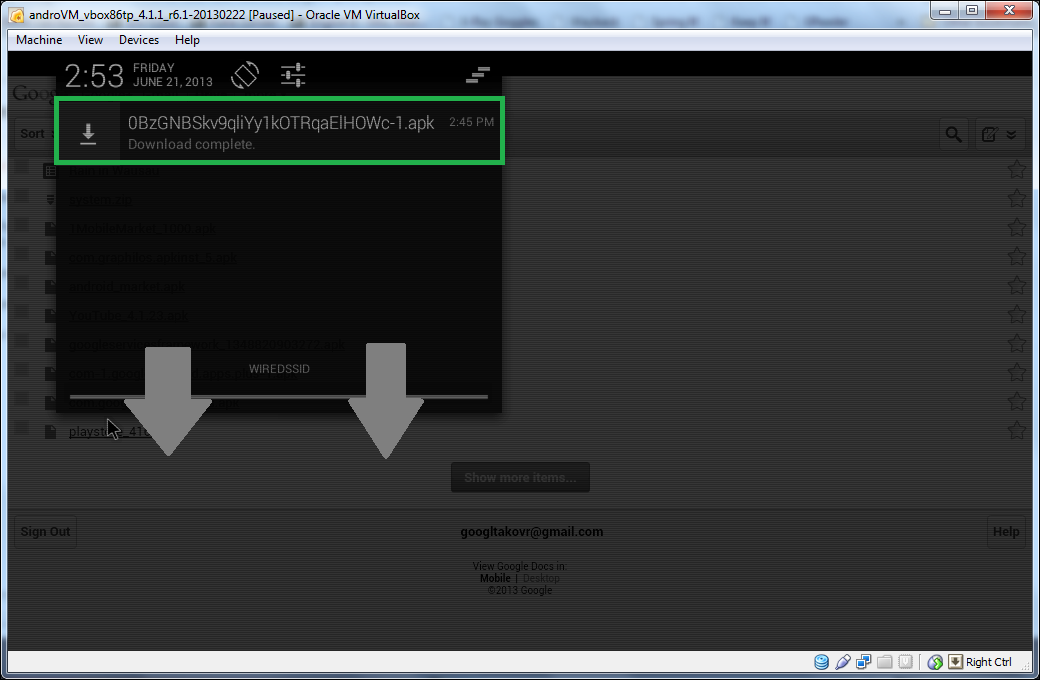
If you already have the app installed, you will get a prompt asking if you want to replace the existing app with the one you are attempting to install. Choose OK if this is what you want to do, otherwise choose Cancel if you don’t want to replace the app, and cancel the installation. Unless you clicked Cancel to the prompt described above, you should now see the following screen (or something similar):

Click Install at the prompt to finish the installation. You should now see:

What you do here is at your discretion: you may open the app to see that it installed correctly (choose Open), or you may return to the Android home screen (choose Done, then hit the Home key on your keyboard. Please continue to step 7.
6b) If you downloaded the AndroVM version with Google Play and Flash Player, the Android startup sequence described in step 6 will commence, after which a setup wizard (no, not this wizard! :D) appears, as shown below:
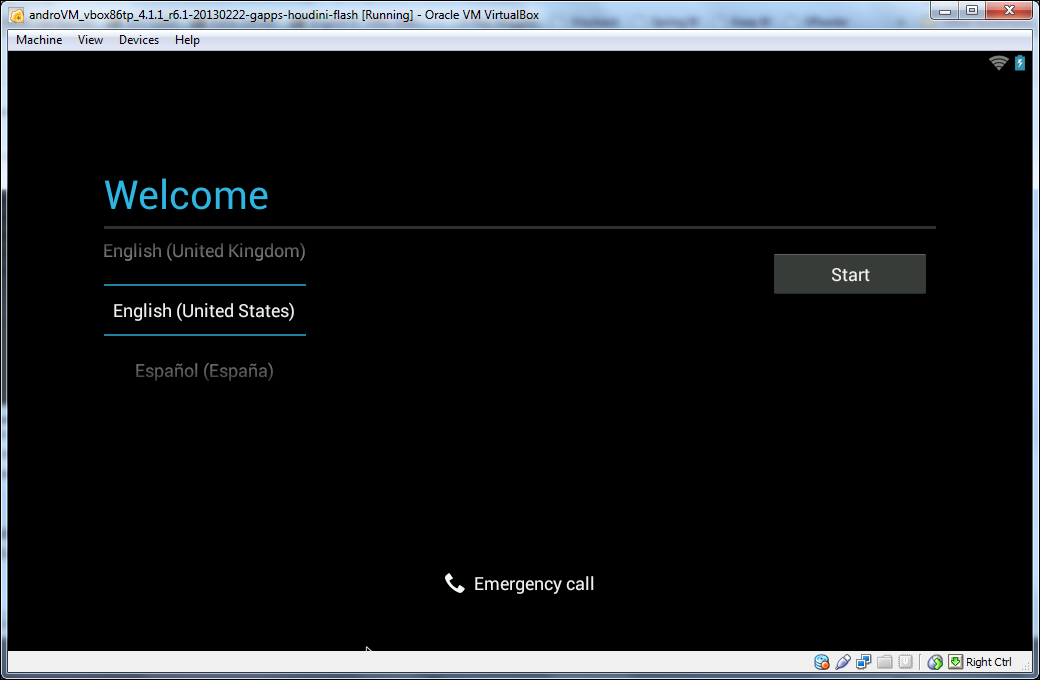
Choose your language from the list below the “Welcome” text, and then “Start” when you’ve chosen your language.
You will now be asked if you have a Google Account (as shown below).

If you use Gmail/Google+/YouTube/Blogger or any of the other Google goodies, select yes.
If you choose no, here’s what you see:
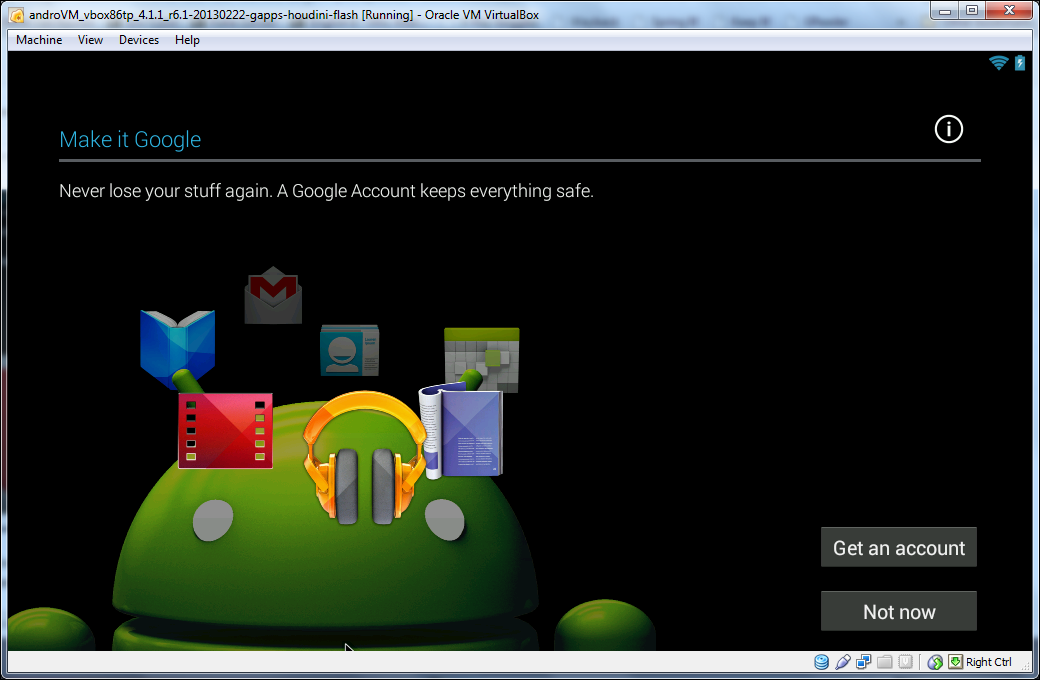
If you choose to sign up for a Google Account (click “Get an account”), you’ll be asked for your name, a Gmail username that you would like, about the same stuff they ask you for when you sign up for one on the Web. Here’s what the setup wizard’s Google Account sign-in screen looks like:

NOTE: If you have two-step authentication enabled for your Google Account, you will be asked to use browser sign-in, as shown below:
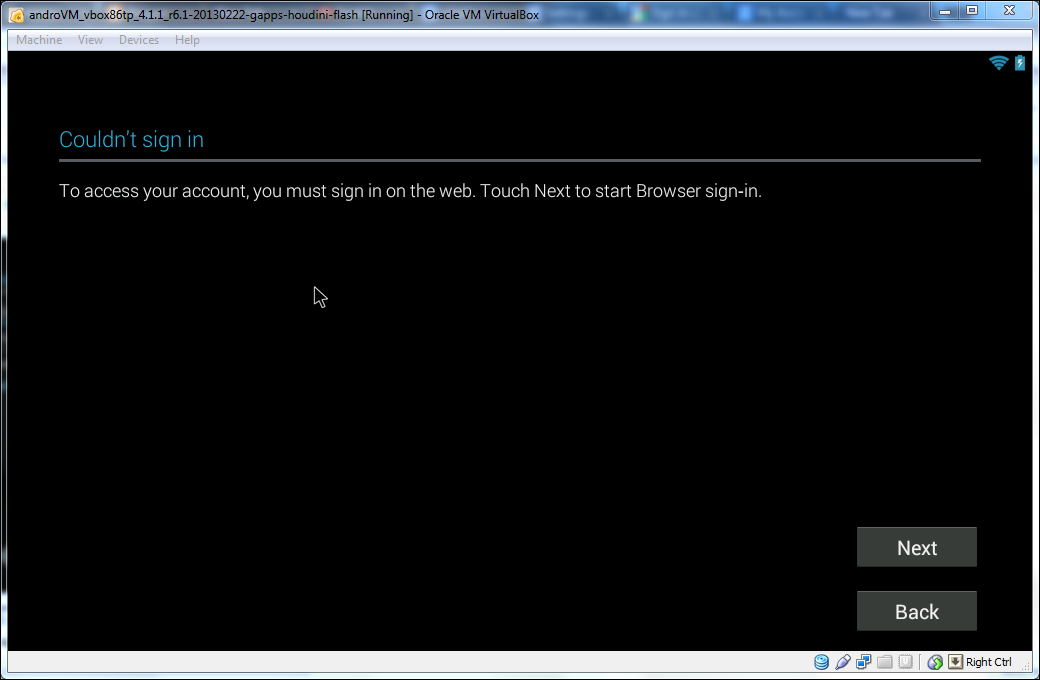
When you’ve successfully signed in, you will see the following screen:

It’s recommended that you not enter credit card info into your Android install, because if the install is not secure enough, a hacker (or maybe an inside job?) could use your data to make app purchases in your name without your knowledge.
Click “Not now” as circled in the above picture, then you should see something like the below screen:

It’s recommended that you leave at least the second checkbox in this page of the wizard checked, because if something happens to your AndroVM virtual machine, you have the machine’s settings backed up to your Google Account, which you can restore from the Google Account at a later time, should you need to do so. The first checkbox, however, will import the settings from your Google Account into the Android emulator, if any settings in said Google Account exist. When you’re satisfied with the backup settings, click the gray forward arrow in the bottom right corner of the window.
If the first checkbox is checked, Google will contact its servers to import settings to the virtual machine.
Next, you will see the following screen:
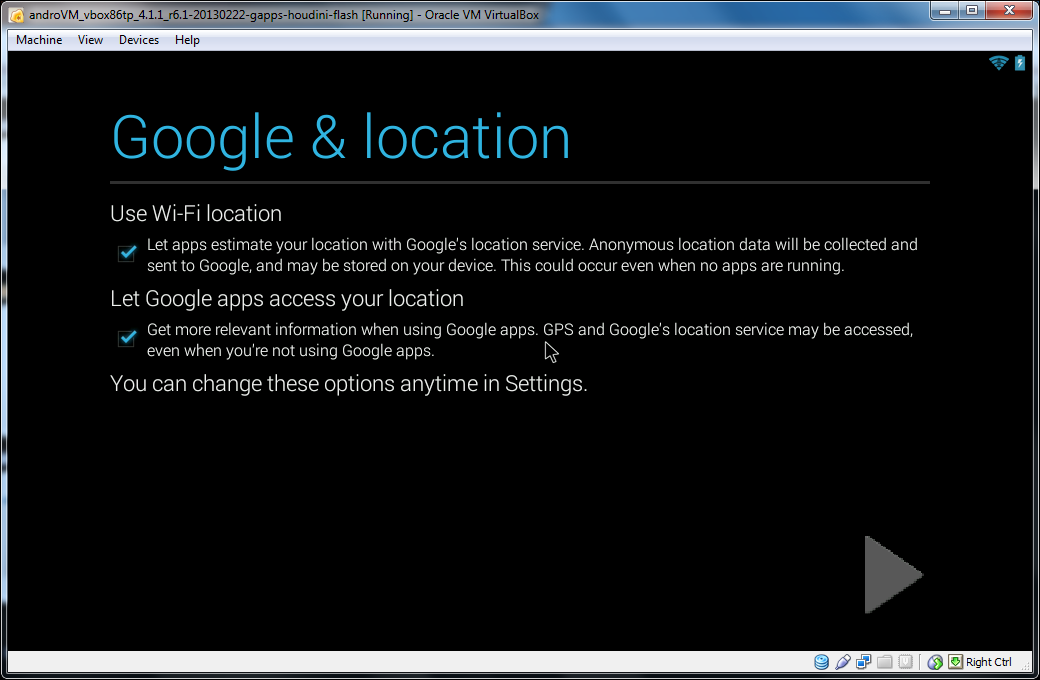
The settings explain themselves, and as before, click the arrow when you’re finished with the page.
Next, you will be prompted to set your current time, as shown below.

Click the forward button when you want to proceed. When you do, you will be shown this screen:

Enter your name, then click the forward arrow.
Finally, you will see this:

Click Finish, and you will see the Android Home Screen, with a little tutorial on how to use it. 
Proceed to step 7.
7) Congratulations, you now have a working AndroVM emulator successfully configured in VirtualBox. But before we cut you loose to explore on your own, here are a few things to keep in mind that will help you use AndroVM better. You should read the keyboard shortcuts for Android, as they contain a wealth of information that you may need.NOTE: If you want to restart AndroVM (either version), you have to use the Ctrl+Alt+Delete shortcut combo. However, you can not press the key combo into the VM without invoking the function of the combination in the host PC. To send Ctrl+Alt+Delete without invoking the function in the host computer, open the Machine menu in the VM window, and click “Insert Ctrl-Alt-Delete”. Note that this will perform an immediate reboot of AndroVM (and not the host PC), and any unsaved work in the virtual machine will be lost.
Also, and this is very important, the AndroVM version with Google Play and Flash Player has backup capabilities, but the version lacking Google Play does not have the backup feature. This means that if something goes wrong (AndroVM won’t boot, etc.), if you are running the version of AndroVM without Google Play and Adobe Flash Player,you may not be able to backup the settings and apps in AndroVM. However, if you’re running the version with Google Play and Flash, and you have backup enabled, then everything you do will be saved to your Google Account, and restoration of apps and settings will be possible.
And another awesome feature if you have the Google Play version of AndroVM: when you go to the Google Play website, you can queue apps for installation to AndroVM (or any other Android device with Google Play) right on the Play website.
Finally, let’s cover the reset option in Android (which may or may not work, but it can be launched in either version of AndroVM). If you ever break AndroVM (or any Android device, for that matter), there is a way to reset it, which may or may not work. First, open the Android Home Screen (tap the Home key on your keyboard) if you aren’t there already. Next, click the circle with 6 dots. Open Settings, then scroll down until you find the “Backup and Reset” listing, and click on it. Next, look for “Factory data reset”, and click on it. Click the “Reset tablet” button, and finally “Erase everything” if you’re sure you want to reset the VM. Next, restart the VM (see note about Ctrl-Alt-Delete above). If the reset doesn’t work, you will need to delete the virtual machine, and create a new one. Be careful though – this will totally delete every app and setting you have put into the VM, so remember to backup!!
If you’re sure you want to delete the virtual machine and everything in it, follow the steps below.
a) First, close the VM window (if AndroVM is open), or start VirtualBox (if AndroVM is closed, and VirtualBox is not open).
b) In the left list of the VirtualBox window, right-click the name of the virtual machine, and choose “Remove” from the pop-up menu.
c) You will see the following dialog box:
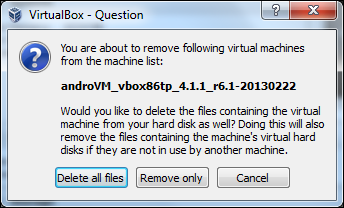
Choose “Delete all files”, and not “Remove only”, because if you choose “Remove only”, it will only remove the listing of the virtual machine in the machine list in VirtualBox, and not the files associated with it. The option to “Delete all files” will remove the files associated with the virtual machine, as well as the listing in the machine list itself.
Thông thường các máy chủ Linux ít khi cài đặt giao diện đồ họa (GUI) và người quản trị từ xa một máy chủ Linux thông qua lệnh. Tuy nhiên có một số người quản trị Linux vẫn cài đặt GUI trên máy chủ. Khi máy chủ sử dụng GUI, để điều khiển từ xa thông qua GUI, có thể cài đặt VNC Server trên máy chủ đó. Tuy nhiên bạn cũng có thể cài đặt công cụ NoMachine để thực hiện việc truy cập từ xa đến giao diện đồ họa.
NoMachine là công cụ remote desktop tương tự nhu VNC. Nó được quảng cáo là nhanh hơn VNC do sử dụng giao thức riêng NX và cho người quản trị có cảm giác như đang ngồi phía trước máy chủ!
NoMachine đã giới thiệu phiên bản mới nhất 4.0, hỗ trợ các hệ điều hành Windows, Linux, Mac OSX. NoMachine cho iOS, Android đang thử nghiệm bản alpha.
NoMachine phiên bản 4.0 có một số tính năng mới sau:
- Thay đổi giao diện so với bản 3.5. Bản cài đặt giờ một file duy nhất không tách thành 3 file nxserver, nxclient, nxnode như bản 3.5.
- Chia sẻ folder, USB device, printer với máy remote.
- Capture video
Phiên bản miễn phí giới hạn 02 connection, nếu muốn nhiều connection cùng lúc cần phải mua bản Enterprise.
Download và cài đặt trên máy chủ Centos
Link Download: Download NoMachine
NoMachine cho Linux được phân phối dạng rpm, deb hoặc tar.gz. Dạng phân phối rpm cho hệ điều hành Redhat, Centos, Fedora. Dạng deb cho các hệ điều hành dựa trên Debian như Ubuntu, LinuxMint. Dang source tar.gz cho các bản phân phối Linux khác.
Download và cài đặt trên Redhat, Centos bản 32bit:
# wget http://web04.nomachine.com/download/4.0/Linux/nomachine_4.0.352_1_i686.rpm
# rpm -ivh nomachine_4.0.352_1_i686.rpm
Download và cài đặt trên Redhat, Centos bản 64bit:
# wget http://web04.nomachine.com/download/4.0/Linux/nomachine_4.0.352_1_x86_64.rpm
# rpm -ivh nomachine_4.0.352_1_x86_64.rpm
Trên máy tính truy cập từ xa cũng phải cài bản NoMachine này.

Đĩa công cụ Active Boot Disk là đĩa công cụ rất quen thuộc để cứu hộ máy tính khi gặp sự cố. Active Boot Disk chứa các tiện ích để phục vụ dữ liệu, xóa dữ liệu an toàn và khá nhiều công việc khác từ đĩa khởi động CD/DVD hoặc USB.
Active Boot Disk dựa trên môi trường WinPE, phiên bản mới nhất là 7.5.2 có các công cụ chính sau:
Trong bài viết này sẽ hướng dẫn công cụ Active Disk Image. Công cụ này tương tự Acronis True Image hoặc ghost.
1. Download
Download phiên bản evalution: Active Boot Disk V7.5
2. Tạo đĩa khởi động
Sau khi cài đặt, chạy công cụ “Active Boot Disk Creator”, xuất hiện giao diện:
Giao diện của Active Boot Disk Creator
Trên giao diện của Active Boot Disk Creator, lựa chọn thiết bị cần tạo, có thể chọn ghi ra đĩa CD/DVD hoặc USB Flash, sau đó chọn Next để tiếp tục.
Active Boot Disk Creator: lựa chọn phiên bản
Trong lựa chọn tiếp theo, tab Editions cho phép lựa chọn phiên bản DOS hoặc Windows (WinPE). Nếu bước trước lựa chọn thiết bị là CD/DVD, có thể chọn cả 2 phiên bản. Nếu chọn USB Flash, chọn “Boot into Windows”.
Có thể lựa chọn tab User’s Files để thêm các thư mục hoặc file. Trong ví dụ này lựa chọn các chương trình PortableApps.
Active Boot Disk Creator: tab User’s Files
Tab Add Drivers được sử dụng để chèn driver vào WinPE, có thể chèn driver của điều khiển ổ cứng trong trường hợp đĩa công cụ Active Boot Disk không nhận được ổ cứng.
Active Boot Disk Creator: quá trình create
Sau khi lựa chọn, nhắp nút Create để bắt đầu việc tạo. Kết thúc quá trình tạo, sẽ có thông báo, trong ví dụ trên, tạo ra file ISO.
Trong trường hợp tạo file ISO, có thể sử dụng các công cụ khác để tạo USB khởi động với lưu ý Active Boot Disk tương tự như WinPE V3. Có thể sử dụng công cụ WinSetup from USB với lựa chọn thứ 2 “Windows Vista/7/8/Server 2008 – Setup/PE/RecoveryISO”.
3. Sử dụng Active Disk Image
Khi khởi động máy tính với đĩa công cụ Active Boot Disk, sẽ xuất hiện giao diện WinPE (V3.1) với menu riêng của Active Boot Disk.
Để chạy chương trình Active Disk Image, click vào nút biểu tượng “Active Disk Image” hoặc chọn menu Active –> Programs –> Active Disk Image. Xuất hiện cửa sổ chứa các tính năng của Active Disk Image.
Các tính năng của Active Disk Image
Để backup disk hoặc partition, lựa chọn Disk to Image.
3.1 Backup disk, partition
Sau khi chạy Disk to Image, có các bước chính:
Bước 1: Chọn Backup Type. Bước này chọn full backup trong trường hợp tạo mới. Khi đã tạo lần đầu, nếu disk hoặc partition có thêm dữ liệu, có thể lựa chọn “Incremental backup”.
Active Disk Image: lựa chọn backup type
Bước 2: lựa chọn Disk, Partition. Bước này lựa chọn một số partition hoặc chọn cả disk.
Active Disk Image: lựa chọn disk, partition
Bước 3: lựa chọn tên file và đường dẫn. Bước này chọn đường dẫn ở ổ cứng khác với ổ cứng muốn backup và lựa chọn tên file backup.
Active Disk Image: lựa chọn tên file và đường dẫn backup
Bước 4: lựa chọn cho file backup. Bước này chọn mức độ nén của file backup, password. Có thể chọn kích thước chia file nếu file backup lớn.
Active Disk Image: lựa chọn cho file backup
Kết thúc việc lựa chọn, Active Disk Image sẽ bắt đầu quá trình tạo file.
Active Disk Image: quá trình tạo file backup
3.2 Recovery
Sau khi thực hiện việc backup, khi hệ thống có sự cố, có thể dùng các file backup nói trên để khôi phục hệ thống.
Để khôi phục từ file backup, trên cửa sổ chứa các tính năng của Active Disk Image nhắp đúp vào “Image to Disk”. Dưới đây là các bước chính:
Bước 1: Lựa chọn file image backup. Bước này chọn đường dẫn đến file backup (đuôi adi).
Active Disk Image: chọn file backup
Bước 2: Chọn Disk hoặc partition. Bước này chương trình sẽ liệt kê các partition trong file backup. Có thể lựa chọn một số partition trong file backup để thực hiện việc khôi phục.
Active Disk Image: chọn partition trong file backup
Bước 3: Chọn Destination Disk. Bước này lưu ý chọn đúng ổ cứng muốn khôi phục.
Active Disk Image: chọn partition trong file backup
Bước 4: Xác nhận xóa hết dữ liệu tương ứng.
Active Disk Image: xác nhận xóa dữ liệu
Sau khi lựa chọn, kiểm tra lại các thông tin trước khi thực hiện việc khôi phục vì các dữ liệu trên ổ cứng, partition liên quan sẽ bị mất.
Active Disk Image: thông tin trước khi khôi phục
Cuối cùng, chương trình sẽ thực hiện việc khôi phục và thông báo khi hoàn tất.
Active Disk Image: quá trình khôi phục
Lưu ý: Active Disk Image tương tự công cụ ghost nên cần chú ý khi khôi phục dữ liệu, tránh việc khôi phục nhầm vào các partition, disk khác làm mất dữ liệu!
Phần mềm SARDU (Shardana Antivirus Rescue Disk Utility) cho phép tích hợp nhiều đĩa công cụ thông dụng vào một đĩa duy nhất và có thể ghi ra đĩa CD/DVD khởi động hoặc USB. Đây là công cụ không thể thiếu dành cho người quản trị.
SARDU chia thành các nhóm công cụ, tiện ích sau:
- Antivirus: bao gồm các đĩa công cụ như AOSS PCTools, AVG Rescue CD, Avira Antivira Rescue System, Bitdefender Rescue, DrWeb Live, eScan Rescue, F-Secure Rescue, GDATA Boot, Kaspersky Rescue CD, Panda Safe, VBA Rescue, Acronis Antimalware, Comodo Rescue Disk, Ubuntu MRT, Microsoft WDO (32 bit, 64 bit).
- Utility: bao gồm các đĩa công cụ như Fdd Win98SE, Clonezilla, Gparted (công cụ phân chia, format ổ đĩa), NT Password (Offline NT Password & Registry Editor – sử dụng để reset mật khẩu của Windows), Ophcrack (dò tìm mật khẩu của tài khoản Windows dựa trên rainbow table), Parted Magic (tương tự như Gparted), System Rescue CD, Trinity Rescue Kit, Ultimate Boot CD (đĩa công cụ tương tự Hiren), Hiren's Boot CD.
- Linux: các bản Linux Live như Austrumi (dựa trên Slackware), BackTrack (đĩa công cụ dùng cho bảo mật, được sử dụng khi học CEH), Damn Small Linux, Puppy Linux, Slax, Ubuntu/Kubuntu.
- Windows: UBCD4Win (đĩa công cụ dựa trên nền WinPE 1.6), LiveXP (được xây dựng từ WinBuilder – WinPE 1.6), Windows PE, VistaPE (được xây dựng từ WinBuilder – WinPE 2.x), Win7PE (được xây dựng từ WinBuilder – WinPE 3.x), WinXP Recovery Disk, Win Vista Recovery Disk, Win 7 Recovery Disk, Windows XP/7/8 Install.
Download: SARDU V2.0.6.5
Sau khi download, giải nén vào một thư mục, ví dụ “F:\SARDU_2.0.6”. Chạy file sardu.exe trong thư mục này. Giao diện chương trình như sau:

Giao diện của chương trình SARDU – Tab Antivirus
Trong bài viết này sẽ nói cụ thể về Antivirus. Các tab khác có thể thực hiện tương tự.
Để tạo một đĩa Antivirus Multiboot, thực hiện theo các bước sau
1. Lựa chọn công cụ
Trên giao diện của chương trình SARDU, chọn tab Antivirus. Nhắp chuột vào đĩa công cụ cần thiết. Theo kinh nghiệm, chọn các đĩa sau:
- AVG Rescue CD
- Avira Antivira Rescue System
- Bitdefender Rescue
- F-Secure Rescue
- GDATA Boot
- Kaspersky Rescue CD
- Acronis Antimalware

Lựa chọn công cụ
Lưu ý: Khi chọn đĩa công cụ sẽ xuất hiện hộp thoại "Are you sure" để chắc chắn bạn download file iso tương ứng. Chọn "Yes" để đồng ý download.
2. Download
Sau khi chọn, chuyển sang tab Downloader, click vào nút Start để chương trình thực hiện việc download.

Quá trình download công cụ
Kết thúc việc download, quay lại tab Antivirus để xem các công cụ đã được lựa chọn.
3. Tạo USB Multiboot

Tạo USB Multiboot
Kết thúc việc lựa chọn và download công cụ, nhắp nút "Search USB" và lựa chọn ổ USB Flash cần tạo. Lưu ý USB Flash cần được format định dạng FAT32. Sau đó nhắp nút "Build one USB with multiboot" ( nút có biểu tượng ổ USB Flash). Đợi chương trình hoàn thành xong việc tạo USB multiboot. Trong quá trình thực hiện, lưu ý thanh trạng thái thông báo dưới cùng.

Quá trình thực hiện
- Lưu ý: SARDU sử dụng syslinux cho việc tạo khởi động cho USB, isolinux cho việc tạo khởi động file ISO.
4. Khởi động máy tính với USB Multiboot
Menu boot như sau:

Menu khởi động
Trên menu khởi động của SARDU, lựa chọn nhóm công cụ, sau đó lựa chọn công cụ cần thiết để sử dụng.


