Showing posts with label CSDL. Show all posts

Wednesday, April 26, 2017

Troubleshooting ODBC Module in Asterisk

Introduction

This article is to introduce troubleshooting steps for ODBC malfunction for Asterisk.

Description

We are resolving following error for ODBC Connection.
$ echo "select 1" | isql -v asterisk-connector
[01000][unixODBC][Driver Manager]Can't open lib '/usr/lib64/libmyodbc5.so' : file not found
[ISQL]ERROR: Could not SQLConnect

Methodology

Step # 1

Create a separate directory odbc/ in /usr/lib or /usr/lib64/ (as available):
$ mkdir /usr/lib64/odbc/

Step # 2

Download and Install latest MySQL Connector for ODBC with suitable for your OS:
$ wget http://mysql.mirrors.crysys.hit.bme.hu/Downloads/Connector-ODBC/5.3/mysql-connector-odbc-5.3.6-linux-el6-x86-64bit.tar.gz
$ tar -zxvf mysql-connector-odbc-5.3.4-linux-el6-x86-64bit.tar.gz
$ cd mysql-connector-odbc-5.3.4-linux-el6-x86-64bit
$ ls lib/
libmyodbc5a.so  libmyodbc5S.so  libmyodbc5w.so
$ cp lib/* /usr/lib64/odbc/

Step # 3

Create or Edit file /etc/odbcinst.ini to add following contents:
[MySQL]
Description = ODBC Driver for MySQL
Driver = /usr/lib64/odbc/libmyodbc5w.so
Setup = /usr/lib64/odbc/libmyodbc5S.so
FileUsage = 1

Step # 4

Create or Edit file /etc/odbc.ini with following contents:
[asterisk-connector]
Description           = MySQL connection to 'asterisk' database
Driver                = MySQL
Database              = <database>
Server                = localhost
User                  = <user>
Password              = <password>
Port                  = 3306
Socket                = /var/lib/mysql/mysql.sock

Step # 5

Add following contents in /etc/asterisk/res_odbc.conf:
[asterisk]
enabled => yes
dsn => asterisk-connector
username => <user>
password => <password>
pooling => no
pre-connect => yes

Step # 6

Add your desired function in /etc/asterisk/func_odbc.conf file:
[FULLNAME]
dsn=asterisk
readsql=SELECT fullname FROM users WHERE extension=${ARG1}

Step # 7

Reload func_odbc.so module or restart asterisk:

Step # 8

Verifying OBDC Connection:

Terminal

To check odbc Connection in terimal
$ echo "select 1" | isql -v asterisk-connector
+---------------------------------------+
| Connected!                            |
|                                       |
| sql-statement                         |
| help [tablename]                      |
| quit                                  |
|                                       |
+---------------------------------------+
SQL> select 1
+---------------------+
| 1                   |
+---------------------+
| 1                   |
+---------------------+
SQLRowCount returns 1
1 rows fetched

Asterisk CLI

To check ODBC Connection in Asterisk CLI:
CLI> odbc show
 
ODBC DSN Settings
-----------------
 
  Name:   asterisk
  DSN:    asterisk-connector
    Last connection attempt: 1970-01-01 05:00:00
  Pooled: No
  Connected: Yes
 
CLI> odbc read ODBC_FULLNAME "XXXX" exec
fullname               ABC
Returned 1 row.  Query executed on handle 0 [asterisk]
Share this on

Monday, February 13, 2017

How to enable sa Account in SQL Server?

When you install the SQL Server using Windows Authentication mode, by default, the “sa” account is disabled. Sometimes, due to users/customers request, you may need to enable the sa account. You need to change the authentication mode for SQL server from Windows Authentication Mode to SQL Server and Windows Authentication Mode to use the sa account.
To Change the Authentication Mode:
Follow the steps mentioned below to change the authentication mode from Windows Authentication to SQL Server and Windows Authentication. You need to remember that, the SQL Server service needs to restart to make this change effective.
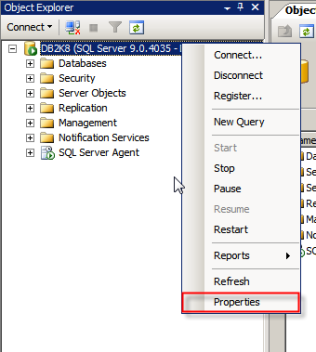
1. Login to the SQL server instance using SQL Server Management Studio. Right-click on the database instance, and go to Properties.
image
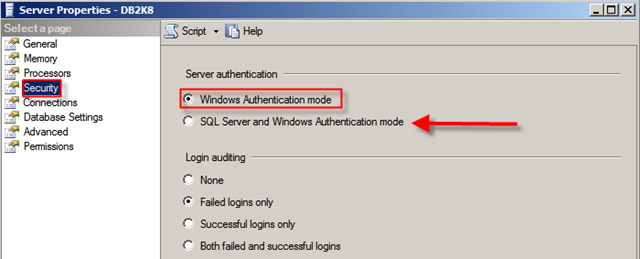
2. On the Server Properties page, Click on Security. Click on the radio button next to SQL Server and Windows Authentication mode, and click on OK to close the  Server Properties page.
image
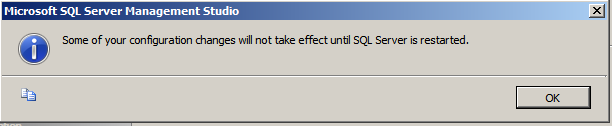
3. Once you clicked on the Ok button, we will get the following screen:
image
As discussed earlier, we need to restart the SQL Server service to make this change effective. After restarting the SQL Server, the authentication mode will be changed to SQL Server and Windows Authentication mode.
Enable the sa Login:
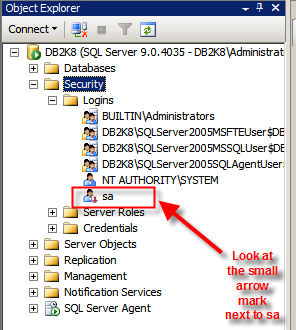
1. Connect to the SQL Server instance using SSMS and go to Security. Expand Security, go to Logins.
2.  You can see the sa account is disabled when you install SQL Server using Windows Authentication mode.
image
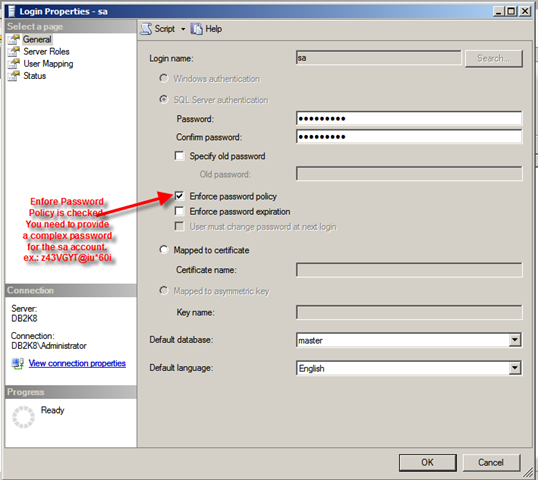
3. Right-click on the sa account and go to Login Properties. Specify a complex password for the sa account. By default, the Enforce password policy is checked. (if you don’t want to provide a complex password for the sa account, you can uncheck this option. However, this is not recommended.)
image
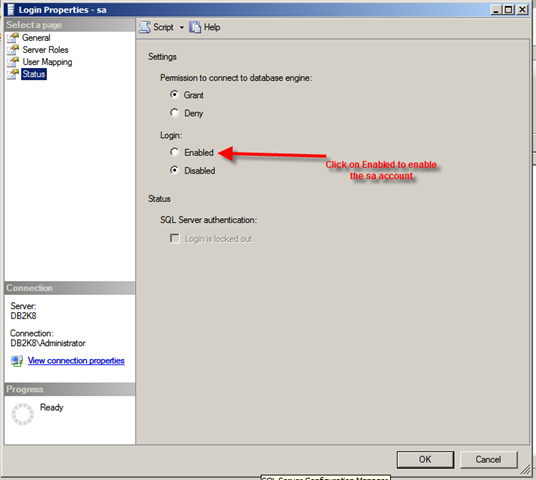
4. Click on the Status page. By default, the sa account will be disabled. Click on the Enabled button to enable the sa account. Click on Ok to close the sa Login Properties.
image
Thus, sa account is enabled and you will be able to login to the SQL instance using the sa account.
If you want to use a script to enable the sa account, you can use the script mentioned below:
1: USE [master]
2: GO
3: ALTER LOGIN [sa] WITH PASSWORD=N'z43VGYT@Iu*60i'
4: GO
5: ALTER LOGIN [sa] ENABLE
6: GO

Twitter Delicious Facebook Digg Stumbleupon Favorites More

 
Design by Free WordPress Themes | Bloggerized by Lasantha - Premium Blogger Themes | Powerade Coupons